Thursday, June 30, 2011

Escaping to cottage country

Posted by Head Fly at 6:52 AM 0 comments

 Aubrey and I escaped to the cottage for a day this week. Sometimes you just need to escape. My brain is swirling with work, and getting the Holiday 2011 collection designed (yes, I have to start this early) So a trip to the cottage was in order. There is something about driving through the countryside that calms me. (Above is a photo from the road that winds down to our cottage)

In my last post I showed you our finds from Coboconk (which is where my cottage is). A new antique shop opened up and we popped in. Although they weren't actually *open* as she was setting up for the long weekend, but let us in .... and was probably glad she did because we bought a LOT.

Table of wooden boxes starting ar $4
The table of wooden boxes, around $4 to $6.

I fell for this oil painting but it was a bit wavy and I didn't know where I'd put her. But I loved her. And she was $65

Vintage rolling pins, $8 each

The owners told me stories of finding treasures in the dump ... yes, the dump. And they invited me to go and check it out for myself. At the thought of finding awesome treasures, I kindly told them I'd be more than happy to let them do the searching and I'd just pay them for their efforts! But can you believe that people throw out amazing things? Honestly, donate it. Don't throw it out. :(

One Day...

Posted by Head Fly at 4:45 AM 0 comments
"One day I will have a house with Ann Sacks tile" has appeared on this blog before. I would like to add to that wish. Soooo.... One day I will have a house with a master bath that includes Michael S. Smith for Ann Sacks tile. Has a certain ring doesn't it?


Playdate Outfit Sew Along: Day 4 - The Flower

Posted by Head Fly at 4:30 AM 0 comments


So now that we've got our top or dress completed, it's time to add the fun, accent flower.  This part of the pattern is completely optional, but I think it adds a nice little bit of whimsy to the outfit.  You can get as creative as you would like with this accessory, but I opted to follow the pattern and just add an extra-large fabric covered button to the center.


You've got to start by cutting 8 petals.  I used the accent fabric for the petals, but you could use whatever fabric you like......maybe even something less matchy and more bold.....it's up to you.


Fold your petals in half, wrong sides together, and stitch down one side.  I clipped some of the bulk off the very tip, so that they would be easier to turn right side out.

After you've sewn all eight petals, turn them right side out.  Try using a sharper point (like a point-turner) to really get the corners nicely turned.  Press with seams down the middle according to pattern instructions.


For the next step, I ran a gathering stitch across four petals at a time.  I then pulled the bobbin thread to gather the petals.  Once I had them gathered tight enough, I tied the ends of the threads together to hold them in place.  I also opted not to top-stitch each petal just because I prefer this look.


Place four of your petals on top of the other four petals in an alternating position.  Then run a stitch around in a circle to hold them in place.


Here is my flower before the addition of the button.  Choose your button and add it to the center of the flower.  I stitched the button onto the flower at the same time I sewed it to my top.


And there you have it - a fun, flower accessory.  I love the idea of adding this flower to a headband or even adding a pin on the back.  I think it would be really fun to make one of these for myself to pin to my purse or cardigan when Savannah's wearing this outfit.  A little bit of "mommy and me" never hurt anyone, right?

Tomorrow is day 5 of our sew along where we will be working on the capris/shorts.  If you've reached your final destination of the sew along and were just doing the dress, don't forget to add pictures of your completed sew along look to The Cottage Home Flickr Pool if you want to be considered for the contest and $50.00 gift certificate.  And for the rest of you, see you tomorrow!

Wednesday, June 29, 2011

Some treasures

Posted by Head Fly at 4:50 PM 0 comments

Aubrey, Oscar and I did some adventuring this week that included some out of town treasure hunting.  This little antique store in Coboconk, Ontario had a table full of the coolest wooden boxes at drool worthy prices (I bought almost all of them). I thought they would make some lovely gifts for a few people I know. Among a number of other things, I also picked up an old rolling pin that had the prettiest blue handle. 
Pssst. My little shop is having a Buy 1, Get 1 Free Sale to celebrate Canada Post going back to work. ;)

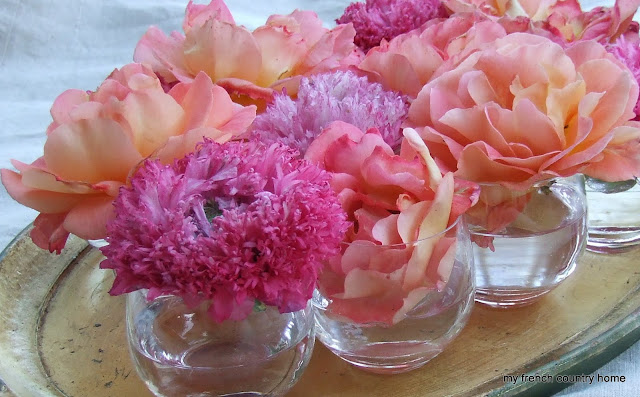
when is a bouquet not a bouquet

Posted by Head Fly at 2:54 PM 0 comments


Summer is here, school is out and the atmosphere has relaxed.  Friends arrive for tea and stay to dinner, meals with friends and family are spontaneous and fun, but you still want them pretty.  My answer to the quickest flowers ever on a table is individual flower heads in small verrines or low glasses.  Dot them all over the table, interspaced with candles and you're away.

And when they're not spread out over the table, group them up tight on a pretty tray and they decorate the corner of a room or a hallway.   Summer entertaining has to be this much fun.


 These rose and poppy heads were from a dinner last Friday - sorry I lost the pictures of the table laid up!   Two days on and they are still pretty, grouped on the tray they can be moved around and decorate to order! !


For a simple barbecue with the children and their friends, nobody wants a sophisticated table, but everyone likes a splash of colour.  I had a bouquet of these duo-coloured roses, and they worked well in single glasses.


I'm sure you have ideas for quick summer table decor, 
if you  send me a picture I'll add it to the post.

............

a few hours later .....  thank you to:

Gina from Art and Alfalfa for this colourful vase


and to Ulrike from In My Garden for her garden flowers in a jar


and to Linda in Denmark for this stunning bouquet from her wedding


Color At The Lake...

Posted by Head Fly at 6:25 AM 0 comments
If I have said it once, I have said it 20 times- I heart Kay Douglass. I was so excited to come across her lake house last night on Atlanta Homes & Lifestyles. I love that she uses so much white, yet bright color. While I love pretty neutrals I crave color in doses just like this. One of these days I am going to have a fuschia wing chair.


LOVE the color cowhides.


More images HERE.

Playdate Outfit Sew Along: Day 3 - Top/Dress (2nd Half)

Posted by Head Fly at 4:30 AM 0 comments

So it's time to finish up our top/dress!  How are we feeling?  Good, I hope......we're in the home stretch, so bare with me.  Yesterday we stopped after finishing up our arm holes and shoulder ruffles, so now we'll move on to the side seams and finishing.


Since you've probably just pressed your shoulder ruffles and arm holes, you will now need to pull the exterior fabric and the lining completely apart (we do this a lot with this pattern).  Place the right sides of the exterior fabric and the right sides of the lining fabric together at both sides seams.  You are now going to run a stitch starting at the beginning point of the two lining fabrics coming together and running all the way to the end of where the exterior fabrics come together.  This is going to cause us to have no exposed seams on the interior of the garment - yipee!!


Here is what your seam will look like on one side.  You will need to run this stitch on both sides.  It's pretty much just sewing a straight line though you may have to turn your foot a tad bit at the arm hole.


I like to clip a line where the exterior and lining fabrics come together under the arm hole.  I find the arm holes lay much more flat this way.  You totally don't have to do this step.......it's just a little extra thing I like to do.


Turn your garment right side out and press the side seams open and press all the way around the arm holes.  I like to press the exterior seams and lining seams separately to make sure they are both fully open. 


This next step is where I took some liberties with the way I like to do a lined garment.  So for the next few steps you can totally ignore me and follow the actual instructions or give this finishing technique a try.  Let's see if I can explain this correctly..........

Currently you have your garment pressed and turned nicely with the right sides out.  At the lower side seam (doesn't matter which one), pull the lining fabric away from the exterior fabric.  We need to pull them apart because we are going to flip the fabrics so they will now have their right sides facing.


In the picture above, you can see the corner where I started turning towards the bottom of the picture.  It's going to feel sort of awkward and weird but just go with it.  You want to try and turn the entire bottom of the dress so the right sides are facing each other.


In the picture above you can see that I now have the right side of my lining facing the right side of my exterior fabric.  I have pinned this in place.  You want to sew along the bottom with a 1" seam allowance (I usually do 1/2" but a 1" hem is what the pattern calls for).  Sew 3/4 of the way across, then leave a 4" gap and finish sewing to the other edge.  See picture below......


Notice how I have left a 3" - 4" opening at the bottom of the top.  Pull the rest of the dress through this little opening.  Again, it's going to feel a little strange, but trust me.

Now that you have pulled the top through the opening, press the bottom seam.  You will have a 3" - 4" opening so you need to make sure to press that under to line up with the bottom of the top.  Place a few pins to hold it in place.


Next, top-stitch around the entire bottom using a 1/8" seam allowance.  This will catch the opening and make it so the entire bottom is closed.  You can use this technique to make garments reversible as well.  Personally, I fell that it ensures that the bottom of any garment is nice and neat and the bottom seam is perfect.  Again, you can totally ignore me if I lost you along the way.........if so, just follow the instructions in the pattern for a more typical way to hem.


The pattern now instructs for some additional top-stitching and button holes.  Again, the button hole placement didn't seem to given exactly, so on the size small, I opted to do four buttons spaced about 4.5" apart.  But you can do them however you would like.

I'm not going to go into details in regards to making button-holes since everyone's machine is different.  I use a button-hole foot attachment with my machine that pretty much does all the work for me.


After you've sewn your button holes, open them with your seam ripper.  I place a pin at the end of each hole so as to make sure I don't rip through the entire thing.  I've been VERY thankful several times that I took the time to take this extra step.


Finally, finish your button holes with fray check or other sealer so that you prevent any additional fraying in the wash.

Whew!  And that's pretty much it!!  We will focus on the optional flower tomorrow.  But for now your top and dress is complete.  If you've made it this far, give yourself a pat on the back.  This was not a garment for the beginner sewer so you should be very proud of yourself!!


Here are a few pictures of the front and back of my top.  And do you think my little lady likes this outfit?  You bet she does (which makes it even more rewarding)!!

Tomorrow we'll work on the flower, which is pretty easy, and we'll move onto the capris/shorts on Friday.  See you then!

Related Posts Plugin for WordPress, Blogger...
 

home appliances Template by Ipietoon Blogger Template | Gadget Review