Showing posts with label DIY. Show all posts

Monday, September 24, 2012

Free Halloween Font - Evilz

Posted by Head Fly at 5:51 AM 0 comments
Although it seems ridiculously early to post Halloween stuff, when it comes to DIY projects it I think the earlier the better. This is a little bit of a recycled post from last year but it's too cute not to share year after year. Download this free font - EVILZ. I used the font last year to make some cute bags for Oscar's friends (shown below). Ps., Instead of candy we filled the fun little bags with toy bats.


Thursday, September 20, 2012

Ikea Hack - Gold Frames

Posted by Head Fly at 8:35 PM 0 comments


Happy weekend. Since I just showed you my trick of how to get the best looking gold frames, here is a post that will give you some inspiration using Ikea. First of all I love Ikea frames - they are economical and are offered in a variety of interesting sizes so you can create interesting displays on your wall. I'm regularly hacking Ikea frames. (Remember this piece?) Above is an example of my latest DIY project, turning an Ikea frame to be a gold shadow box with modern art. 

Step 1: Start with this Shadow Box Frame from Ikea


Read more »

making gold frames

Posted by Head Fly at 12:14 PM 0 comments
When we were first married, I decorated our little apartment with a ton of black frames. When we moved into our current house the black frames seemed too dark against our beautiful white walls. Alternatively, white frames seemed to beachy and light wood felt too Mid Century Modern. I decided gold frames were what fit my house best - traditional, but when mixed with the right print it felt was modern and youthful.

The problem was 1. We had no money to invest in new frames and 2. Even if we did have the money,  I couldn't find nice looking gold frames anywhere in retail stores and custom made by a framer were well out of my budget.

Seeing as I had a LOT of black frames lying around, I decided to try my hand at transforming frames into what I wanted - a rich gold frame look. Now, although you could spray paint frames gold - I found that it ends up giving you a pretty flat look and it didn't impress me very much. So I found a trick to get the best looking gold frames ever...
Read more »

Thursday, September 6, 2012

Art Resin / Epoxy

Posted by Head Fly at 5:30 AM 0 comments
Over the last few years I have noticed an emerging trend of art that has a thicky shiny coating over it. After some research discovered that artists would pour an epoxy/resin over their art. As the epoxy dried it gave the art a wet, shiny look. But to the touch it was a hard, thick protective shell. 

Intrigued, I googled some more and I discovered that this process was easy to do - and the mixture was available to the public to buy. So about a year ago I bought some from ArtResin.com with the intention to do some art. My order was delivered and truthfully I was a little bit nervous to tackle the project. Mixing chemicals isn't really something I'm awesome at (memories of grade 7 science class) - but I can tell you that after trying it, it is SUPER easy and the results are so fun. Really, any adult can do this. I made an art box with a photo of my brother (shown above). If you're interested in the process, more details after the jump.
Read more »

Wednesday, August 15, 2012

Concrete Planter Take 2

Posted by Head Fly at 5:29 PM 0 comments

At the risk of overloading everyone with "concrete" projects. This was kind of too fun not to share. Now although I love the look of the concrete planters I made "as is", I've been itching to try a project where give something the look of being dipped in paint.  Last night I used painters tape to section off the bottom of the concrete planter and painted some light blue on the bottom. I pulled off the tape and voila! Depending on how deep your holder is it could hold pencils, pens, cooking utensils in your kitchen or even use it as a vase (if you maybe put a glass piece inside to hold water.) Anyways, just for fun. xo Linds

diy concrete planters

Posted by Head Fly at 6:29 AM 0 comments


At the cottage I finally did a project I've been itching to do for over a year, and that was to make some concrete planters. After my last visit to Trent University - I fell in love with the campus again and the nod to mid century modern. The concrete buildings, the straight lines. I was inspired. So while at the cottage I took on the project to try to make them, and I LOVED how they turned out. They are super easy. Want to make your own?
Read more »

Monday, February 27, 2012

DIY Abstract Art

Posted by Head Fly at 6:26 AM 0 comments

I've been slowly adding elements to our living room to make it complete. One of the big puzzle pieces that the room has been missing has been art. We had a stumbling block - The art I did like was out of our price range....so I decided to make my own.

I purchased a canvas in December, and it has since sat in the basement waiting for me to work on it. Although I've done abstract before (Perhaps not on purpose), doing it at such a huge scale like this [40" x 40"] proved to be intimidating. Fast forward to an evening last week and I felt a sudden need to paint. I had already primed the canvas black a few weeks earlier, so all I needed was the willpower to put that first brush stroke to the canvas. So when out of the blue I felt the need to paint - I did. And I'm happy to say, I love it!

Although this canvas could hang without framing, I'm going to get it framed. [pending costs] Right now it sits on the console, and is bringing beautiful colour to our room. I adore it. To read some tips of what helped me create the art, read more. :)

Read more »

Tuesday, December 20, 2011

home made centre piece for your christmas table

Posted by Head Fly at 5:46 AM 0 comments


If there's a moment in the year when you can be a little more daring with your flowers on the table it has to be the holidays.

This is the moment when I like to use flowers plus .... other things.  A lot of you have told me that you are decorating with white, silver and fresh green this year, so I tried to put together an idea that may fit in, using materials that most of us have in the home already  or that are inexpensive to buy.


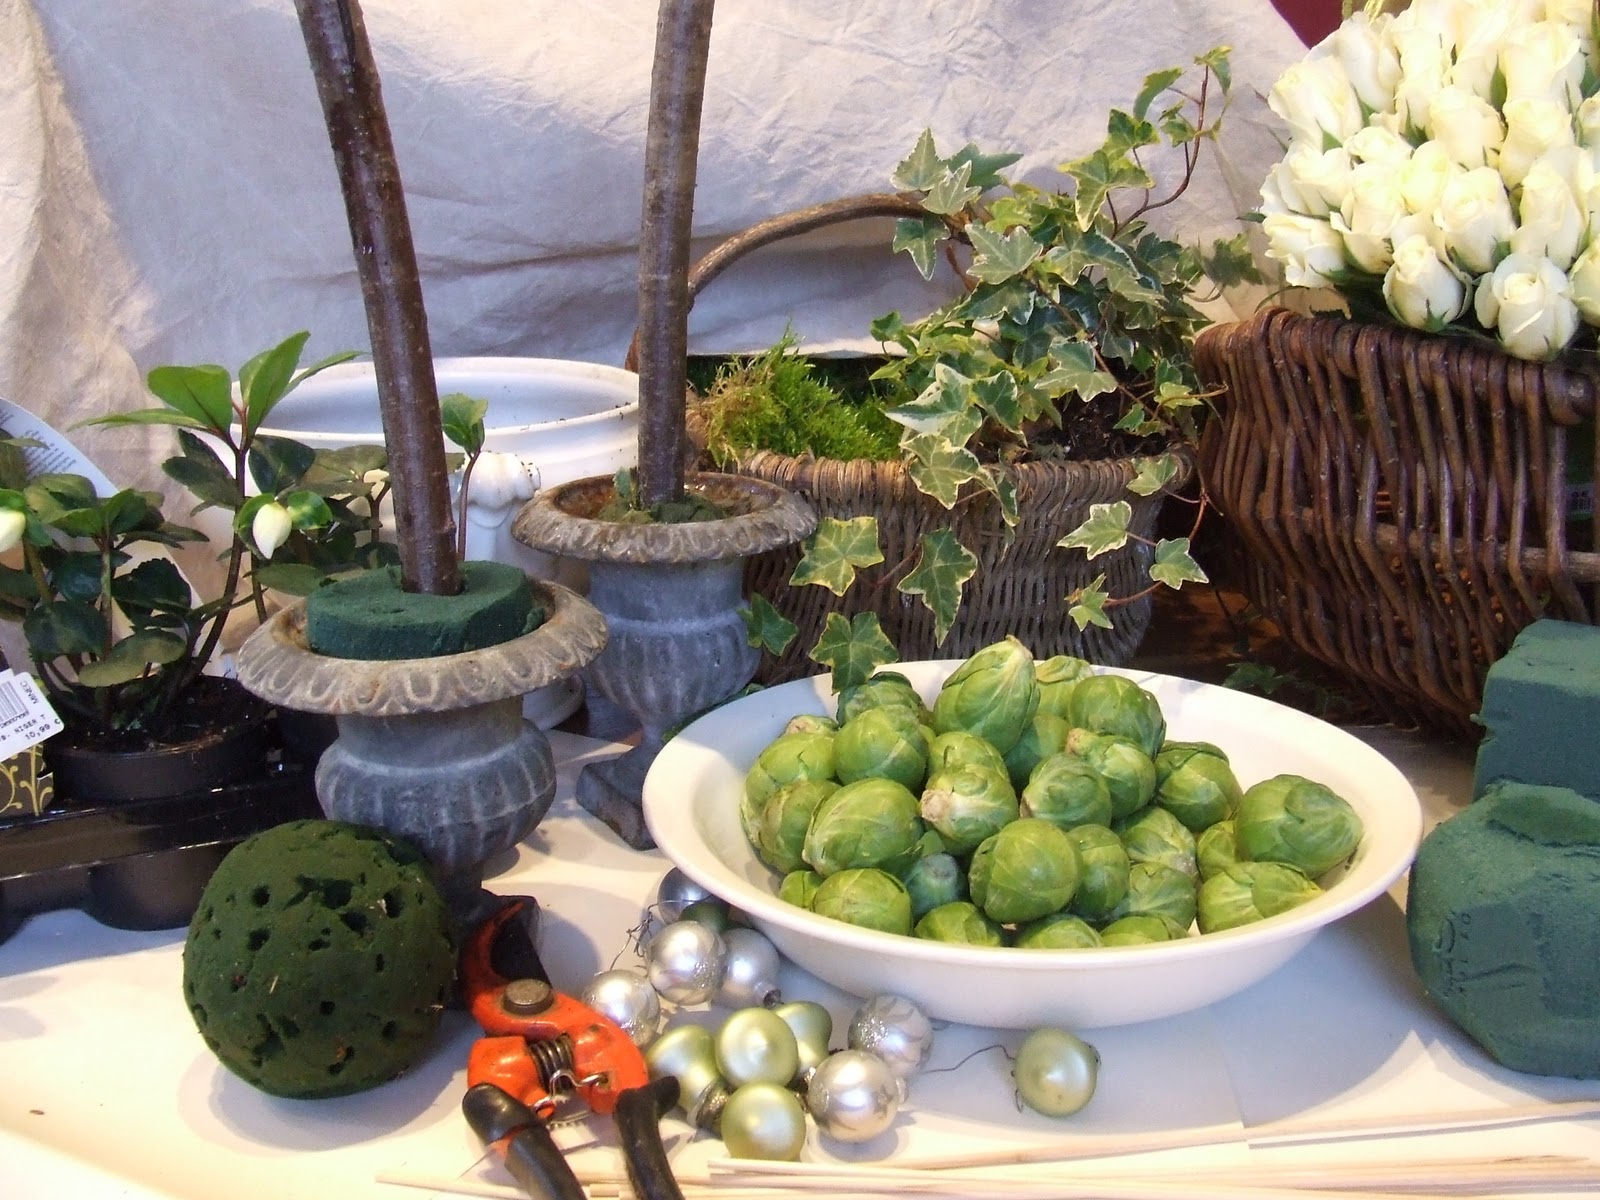
 To make these centrepieces, I used two urns I already had, some florists foam (either already ball shape or cut into a ball from a new brick);  wooden barbecue skewers;  a bunch of cuttings from a box hedge; a bunch of small white roses, some small Christmas baubles and a bag of  ... brussel sprouts!


Start by soaking the balls of foam in water, the wetter they are the longer your arrangement will last.  Actually you can increase the lifespan by putting these out into a cool garage each night.  Stand a straight branch in each recipient or urn, and make sure they are firm using stones, foam, even plaster if you wish.

Push each ball down onto the stick to create the hole, then take them off again to start building up the arrangement.


After you have put small lengths of box all over the ball, prepare the brussel sprouts.  I use these because I love their colour, their small tidy shape and because they last for a long time, even if the roses need changing.    Peel off any discoloured leaves, then push a short length of skewer into the base of each, position on the ball of foam.


Start building up the ball, using the sprouts, roses and baubles, with some more box if required, until the foam is completely covered and you have a nice round shape.   Push the ball back onto the 'trunk' and check the shape, then cover the base with some beautiful green moss.  Voila!


The same idea works just as well with red roses and tiny apples or lichi.  Pine cones are good too, but can be more difficult to fix to the foam.


While I was already making a mess I also popped a few white hellebore with some baby ivy into an old soup tureen and surrounded it with moss.  Doesn't look spectacular for the moment but it will grow during the holidays.


Hope you enjoyed that, I'll be back tomorrow with something else!

Wednesday, November 9, 2011

Most popular holiday crafts that you've pinned...

Posted by Head Fly at 5:31 PM 0 comments

I see a lot of people pinning our Holiday crafts that we've done, or, in the case of #3, blogged about (I'm almost done making my own version!) Since last Christmas my little blog has new readers who may have missed these - so I thought I'd just do a quick roundup of the popular ones for you.

1. An acorn tree that my Mom made me
2. Simple Candy Cane bark wrapped up in celophane or, maybe a pretty bag make great inexpensive gifts
3. DIY Advent Calendar by Kai Ethier that I adored - I'm in the process of making now for Oscar (stay tuned) and
4. Easy ornaments, perfect for babies first Christmas - I plan on doing this for Oscar many, many years to come. [Blogged here]

xo Lindsay

Sunday, November 6, 2011

DIY Train Board

Posted by Head Fly at 6:22 PM 0 comments


Oscar loves trains. When you go to places like MastermindToys they have an awesome train table by their Thomas section. As much as those tables rock, they are problematic for us. 1. A train table is expensive (A few hundred dollars for just the table) 2. It is also HUGE - It takes up a lot of room and 3. I don't like the look of the tables that they sell. They are really decorated and branded, and not really to my taste. Part of me thinks many times, simpler is, better.

Taking a trip back in time, when we were young, my Dad had actually made the nicest train board for us. It is still is around and Oscar plays on it every week when I visit my family. The minute he is in the door, he bolts to the living room, to where my brother has set it up for Oscars visit. It's SO cute.

The reason why this is awesome vs. a table is that you can slide it under a couch, or, store it somewhere easily compared to a table. Having a party? Pick that board up, and hide it in the furnace room. Aubrey and I spent the last few weeks constructing Oscar his very own board. The board itself is very inexpensive, the expense is all in the track + accessories. And, in terms of time - the most time you will also spend on it, is figuring out a train layout. (I think Aubrey spent a few hours trying to figure out exactly the pattern of the track) You can see the finished product below...


For full instructions, and to see the original that my Dad make, click to see more after the jump...

Read more »

Wednesday, October 19, 2011

Bulletin Board Project, Round II

Posted by Head Fly at 9:29 AM 0 comments
Thanks for all the super sweet comments of the taping of Steven + Chris. So now that it has aired, I can spill some more beans. Originally, part of my segment for Steven & Chris was going to to show how to make my easy fancy bulletin board board project infront of the audience. But Steven getting sick and the taping date got changed, and, the date I was to come got totally filled up (likely because Rocco totally trumps me in the cool factor) and then my DIY was threatened of being cut all together.

But I was delighted when they proposed that I do an web-exclusive taping (seen here). Before I knew of the style of segement changing I had already done a different bulletin board to show how fabric can totally change a look. My board [seen here] is a feminine look, and, also a plain fabric - so in order to show fabric can totally changea look, I went for a plaid.


Isn't the fabric GORGEOUS!? The fabric is from In Vu Drapery. And, for this board, I made more button tacks. Buttons people - go buy TONS OF BUTTONS! It's the easiest project ever!!


There you go, the bulletin board project that I think would look uber cool in a young guys bachelor pad. (Or my office, because I'm obsessing about that fabric)

Monday, October 17, 2011

me and a tin of black paint

Posted by Head Fly at 12:56 PM 0 comments

Black in small doses  seems to work well at the moment.  It compliments the neutrals we love so much, and tolerates the occasional loud splash of a brighter colour.

I've had fun restoring an old and very battered backgammon board found for next to nothing at a fair, and then since I had some paint left over, I tried it on a cutlery box.  What do you think?


 the box when I started - not a pretty sight!
- I replaced the main panels and painted them ... black -


- I toyed with the idea of leaving the board without any markings -
- I tried to call it stylish; my son  called me lazy -
so we compromised and I painted in the simplest board possible!


 then I moved onto a cutlery box ...


I can't sign off without thanking you for all your kind words about my pictures
this weekend - you really know how to make a girl happy!!
Thank you for reading my blog, thank you for your generosity!


Tuesday, October 11, 2011

DIY (Fancy) Push Pins

Posted by Head Fly at 6:22 PM 0 comments
When I was buying my upholstery tacks for my BIG bultin board at MacFab the other week, I noticed that they have a wall of the most amazing, amazing buttons.  I went back the other week and picked up the prettiest buttons I have ever seen and turned them into fancy push pins for my new bulletin board...


Although they technically can work as push pins they are they aren't as easy to pull in and out as a regular tack. So I'm using them more as decoration. However --- because they are so big and - they can actually hold heavy items like keys or necklackes. (So good idea for  a dressing room!)


Some Tips:

1. The bigger the button, the better.
2. Different Tack. The upholstery tack I used to go around the buttin board as decorative detail had rounded edges. Those won't work well for this, because of the rounded head. For this project, although technically still upholstery tacks - they have a FLAT head, making it easier to appy to the button.
3. Take a look at the back of the button. Some buttons have little nubs at the back, which makes it hard to glue things onto it. It's not impossible to use, just a little trickier.
4. Use Gorilla Glue  - it is THE best glue for this project. I tried a glue gun and although it works for a wee bit, it comes apart when you actually use the push pins.

I am now offically obsessed with buttons.


All Supplies from MacFab in Toronto

Sunday, October 2, 2011

mini bunting

Posted by Head Fly at 6:58 PM 0 comments
Because of Google Analytics I get to see how people come across our blog. And, sometimes I follow links to see what the post, or article may have been about. This is how I stumbled upon this gorgeous, unique nursery. This delightful blogger used my free bunting flag, the same one I used for Oscar's nursery. Want your own? Go back to my original post to download it yourself. But you must go check out this blog, she has the most amazing style.
Photo Via

Monday, September 19, 2011

Updating a regular bulletin board

Posted by Head Fly at 5:38 PM 0 comments
I love bulletin boards in my studio. I like to tear things out of magazines for inspiration and have them in front of me. Patterns and colours I see in home decor and fashion magazines help inspire not only my home, but my stationery.

Although I like bulletin boards, the cork colour isn't my favourite. So the same night I updated the bulletin board on the opposite wall, I wrapped this board with the same canvas (the same as we made a tent out of!) This board had a frame that made it the perfect contender for some nail head detail.  So this is what I started with...


And I updated it to this...


SUPER easy.
I stapled the canvas over the bulletin board using my desk stapler. Lots of awesome tutorials out there on that but really, you stretch the fabric and staple. Done.

Next, I wanted to make it more finished so I decided to do nail heads. I had heard that upholstery nail head detailing came on "trim". It is quick, and easy. The way that this  trim works is that it nail heads (with no pins) come on a piece of "trim". Every 5th nail is a hole, you punch in a "matching" nailhead that has a a tack that holds the trim in place, and it is supposed to blend in. I searched EVERYWHERE for this and finally had to buy it sight unseen from the manufacturer in Toronto. Total cost for this, $30 + shipping.


Problem is. The stupid "Matching Nails" that are every fifth spot didn't match! Want to see the proof, look at the picture below. The best spot to look is the top row. How on earth can they sell it like this? Bah. So mad. I think my exact words when I saw it was "You've GOT to be kidding me". Even though they didn't match I tried to see if it would work. Nope.


In an ode to Tim Gun I said to myself "Make it work". I bought some silver paint and tried to paint the little matching heads to blend in. Looked awful. I then cut pieces off the trim and glue gunned the nice looking pewter heads over the discoloured. But the problem is, the ones I glue gunned we're higher than the rest so, well, they still stood out. I threw my hands up. The easy route of this trim was not for me.

So, I went to MacFab here in Toronto, where they had a HUGE selection of nails and bought 500 individual nails and...


It is a little hard, and requires some concentration to put each one in in a straight line but I had a natural guide of the frame. Even still, any variation in the angle I put one in, could throw the whole look. But I'm really happy at how it looks...


Love it. Probably also because it reminds me of my beloved Colette Bed.

(And pssst, you can see the start of a matching project on the other wall)

Tuesday, September 6, 2011

No Sew Tent

Posted by Head Fly at 4:53 AM 0 comments
I have had an obsession with teepee's and I really wanted to get one for Oscar. Buying one turned out to be  expensive , and the DIY method seemed difficult [I don't own a sewing machine]. So I was kind of bummed we wouldn't have one. A few weeks ago, I happened across this post on the blog "Cakies" where Rubyellen made an A-Frame tent. Although her version was 99% perfect, her version still required sewing. So I modified her idea to be a no sew alternative to a teepee and her A-Frame idea. And this is what I made....


I LOVE it. So it's REALLY easy to do. (And so does Oscar as you can see above.) Before I get into my instructions, if you do decide to tackle this project you should see Rubyellens step by step as it is awesome. So my version of the project is broken in to 3 Parts [1] The Frame [2] The Cover and [3] Bunting Flag.

Read more after the jump

Read more »

Tuesday, July 26, 2011

Clean vs. Dirty - Free printable

Posted by Head Fly at 6:15 PM 0 comments
One thing that happens a lot in my house is I start to do laundry, and it piles up and sits at the foot of the basement stairs. I can't carry it up the stairs along with Oscar, so it sits there waiting for a chance for me to bring it up to the bedroom. But the following usually happens.... Aub will be in the basement and yell up at me...

"Is this basket full of clean or dirty??"
And I usually yell back as I'm chasing after a bare bottomed baby "I have NO idea"

So I designed a card that is 2 sided, and I put ontop of the clothes in a bin. It helps Aubrey and I know what is in it.
Here is how you can get your own too.

Step 1: Download the page I designed
Step 2: Cut the signs out
Step 3: Laminate back to back. If you don't have a laminator, bring it to your local office store, they will do it for around $2.00 or less.

One side says "Dirty - Please Clean Me" and the other side, says "Clean - Smells like fresh cotton - how lovely"

The download won't be available forever, so grab it now if you like it. And because I have to say this...it's not for resale. Just for personal use. Thanks! xo Linds

Friday, July 8, 2011

Banana for Boxes

Posted by Head Fly at 5:49 AM 0 comments
This past week has gone by much too quickly. Aubrey and I been searching for the right fridge and console.  We got our Dining Chairs delivered. (I'll post them next week!) I've also busy with work getting ready to launch some new product. But during the days Oscar and I play and go for walks. I got my delivery of shipping supplies so Erin, Hudson and I made a fort in our backyard.
I have a feeling my monthly delivery of shipping supplies is going to be a big hit with the boys.

Thursday, July 7, 2011

garden favours

Posted by Head Fly at 11:22 PM 0 comments


The first show of annuals is fading away in the garden, leaving behind their seed pods and making space for the next wave.

This is a good time to make some very personal favours, gifts to special friends, thank-you's to a dinner hostess.  I've found an idea that seems to please, costs nothing and takes less time than required to write this post !!

 To make these little packets of home grown seeds, you'll need some greaseproof or waxed paper, a sewing machine, paints and ......  some seeds.  Here I chose seeds from a pink lupin.


To create a tiny and very simple watercolour, don't get ambitious, keep it simple, naive even.  You're not looking for a botanical print - unless you're clever enough to do that, then just go for it !! - For the lupins, I first painted in some rough lines showing the position of the lupin heads and some foliage beneath.


Next I dotted in some of the lupin colour, blotting with kitchen paper as I went to keep everything soft.


I painted in the name of the flower, again as simply as possible


To make the seed sachet, I simply folded a piece of waxed paper in half and machine sewed each of the long upright sides, making a sachet open at the top.


I popped the seeds into the sachet, you don't need very many, and sewed the little painted paper onto the top of the sachet to seal the seeds inside.  Voila !  I told you, it was quicker than this post to finish !
Oh yes, and just for fun I added the words 'de mon jardin'  -  from my garden.


Any flowers will do for this,  providing they are easy to draw - Nigella is good because they are so vague and fluffy!  Have fun!


Related Posts Plugin for WordPress, Blogger...
 

home appliances Template by Ipietoon Blogger Template | Gadget Review