Showing posts with label Salad. Show all posts

Friday, August 3, 2012

Tex-Mex Salad Recipe

Posted by Head Fly at 4:00 AM 0 comments

I love, love, love southwestern food or as some would call it, Tex-Mex.  This is an easy salad that is the perfect accompaniment to enchiladas, tamales or just add in some chicken and you've got yourself a salad that's hearty enough to call dinner.

 Tex Mex Salad
Serves 4-6 (main dish)
Serves 6-8 (side dish)

Ingredients:
2 heads romaine lettuce
2 avocados (chopped)
1 cup frozen corn (defrosted) or fresh (if it's in season)
1 can black beans (drained and rinsed)
1/2 red onion, diced
1/2 red bell pepper, diced
1 Tablespoon white balsamic vinegar
1/2 cup sour cream or reduced fat sour cream
1/2 cup salsa
2 teaspoons chile powder
1 teaspoon cumin
1/2 cup shredded Mexican cheese blend, plus more for garnish
1/4 cup fresh cilantro, chopped plus more for garnish
Salt and pepper, to taste
2 limes
Tortilla Chips

Directions:
Make black bean and corn relish.  Combine black beans, corn, red onion and red bell pepper.  Pour over white balsamic vinegar (or other light vinegar), squeeze the juice of 1/2 of a lime, season with salt and pepper and allow to sit for a half an hour or up to one day.

For the salad dressing.  Combine sour cream, salsa, the juice of half a lime, chile powder, cumin and salt and pepper.  Stir to combine.  Every salsa is a little different so you may need to add more salsa or add more sour cream to reach the desired consistency for your dressing.  Taste it to see if you would like to add any more of the seasonings as well.

For the main salad.  Chop up romaine lettuce.  Add avocado, black bean and corn relish, cheese and cilantro.  Pour over dressing and toss to combine.  Garnish the top with more shredded cheese and a bunch of cilantro.  Serve with cut up slices of lime and tortilla chips.

If you would like to serve this as a main course, I would suggest adding some grilled shrimp, chicken or  sliced flank steak.


Enjoy!

Tuesday, July 19, 2011

Summer Pasta Salad

Posted by Head Fly at 4:30 AM 0 comments

I love a good pasta salad, don't you?  I've tried tons of different recipes and I don't know if I've ever met a pasta salad that I didn't really like.  For Matilda's "Tea for 2" party I wanted to do an updated version of a traditional classic.  This is my version of Summer Pasta Salad with fresh herbs, sun dried tomatoes, peas, black olives and asparagus.

Serves 15-20
Ingredients:
2 lbs. tri-color rotini pasta
1 cup zesty Italian dressing
1 cup Caesar dressing
1/2 jar of sun dried tomatoes packed in olive oil
10 fresh chives
Handful of fresh parsley
1/2 cup fresh basil
2 small cans sliced black olives
Half bag of frozen peas, thawed (run under hot water)
10 cooked asparagus spears, cut into 1" pieces

Directions:

Cook pasta according to package directions.  Once cooking is complete, rinse thoroughly under cold water to remove starch and set aside.


While pasta is cooking, make your dressing for the pasta salad.  Combine both dressings, sun dried tomatoes (with some of the olive oil), and all the fresh herbs.  Place in a blender and puree until dressing comes together.  Feel free to add any additional fresh herbs that your family loves.


Pour dressing into a large mixing bowl.  Combine pasta, olives, peas, asparagus, and dressing until pasta is fully coated.  Place in refrigerator to cool.  Remove from refrigerator 1 hour prior to serving and stir.  Can be made up to two days ahead of time.


 Garnish with fresh parsley or any other herbs.  We just happen to have a lot of parsley in our garden this year so that's what I chose to use.  My Grandma Marge always taught us to never serve a dish without a garnish.  I think she would be proud.


This is a wonderful dish for entertaining because it can be made up to two days in advance and only continues to get better the longer it sits.  You can add any vegetables that are in season or that your family enjoys.  I think this would be amazing with some grilled zucchini or roasted bell peppers.  Just make the dressing and see what you happen to have on hand - you can't really go wrong!

Monday, April 18, 2011

Breaded Chicken Cutlets with Orange and Arugula Salad

Posted by Head Fly at 1:17 PM 0 comments

I'm not joking when I say that this recipe is ridiculously good!  I can't take credit for this one since it is actually a Rachel Ray recipe, but man, I had to blog about it because my husband and I just loved all the flavors.

This recipe has the perfect balance of sweet, tart and savory all in one bite.  Serve it with mashed or roasted potatoes and you have a meal that is fit for entertaining (or an easy weeknight dinner).

I'm not going to post the recipe here, since I can take credit for it, but you can find it HERE.  I will, however, tell you the minor changes I made that you might want to give a whirl if you decide to give this recipe a go (which I highly recommend).


I breaded the chicken pretty much the same, however; I used panko bread crumbs instead of regular.  You can find panko bread crumbs in most major grocery stores in the same section as the regular ones.  I find they add a crunch to breading that really can't be beat.  The orange zest is key in this breading, so don't leave it out even if you think it sounds strange.


For the orange and arugula salad, I made a vinaigrette from 1/4 cup olive oil, 2 Tablespoons orange juice, 1 Tablespoon Dijon mustard, salt and pepper.  I used small tangerines instead of regular oranges which made assembling this dish really easy.  Arugula has a very peppery, bitter flavor when tasted on its own.  Personally I don't love it by itself, but pair it with something sweet or savory and the balance of flavor is amazing.


I served our chicken cutlets with homemade mashed potatoes.  We had some leftovers and it was equally as good the next day.  So cook up some extra cutlets and have some chicken to use in other dishes throughout the week.  If you don't like arugula or don't have any on hand, the chicken cutlets by themselves are still very good.  But if you can, go for the salad on top - it is diviiiiiiine!

Again, click HERE to go to the Rachel Ray recipe for  
Breaded Chicken Cutlets with Orange and Arugula Salad.

Monday, April 11, 2011

Walnut Chicken Salad Sandwiches

Posted by Head Fly at 6:38 AM 0 comments

Walnut Chicken Salad is another easy recipe with a few ingredients that is "oh so good."  I remember this recipe from late junior high and high school.  My mom and I used to be in National Charity League (NCL), which is a mother-daughter charity group, and every year we would have an annual tea.  Everyone would bring something to the tea, but there were specific recipes that were used each year and this Walnut Chicken Salad was a staple every single time.

I'm on kind of a bagel kick right now, but traditionally this is served as a tea sandwich.  Serve the chicken salad in between two pieces of white or wheat bread, cut off the crusts and cut into four triangles.  This is a great dish if you are hosting a lunch or wedding/baby shower.  It can be made up to a day in advance and just chill in the refrigerator.
 
Walnut Chicken Salad

Ingredients:
2 roasted chicken breasts (bone-in) or a pre-cooked rotisserie chicken
1/2 cup chopped walnuts
3/4 cup good mayonnaise
Salt and pepper, to taste
Olive oil (for roasting chicken)

Directions:


Drizzle chicken with olive oil and sprinkle liberally with salt and pepper.  Roast chicken breasts (bone-in) in the oven for 45 minutes at 400 degrees or until the juices run clear.  You can also use a store-bought rotisserie chicken for this dish and just remove the meat from the bone.


Once chicken is cooked through, remove the meat from the bone and discard the skin.  I find roasting the breasts with the bone-in gives the chicken a ton more flavor than just a regular chicken breast - it also keeps it moist.  Chop or shred the chicken breast.

Combine chicken breast meat, mayonnaise, walnuts and salt and pepper.  You do not want too much mayonnaise in this dish because it will over power the chicken, so just enough to keep it moist.  Add more if you think it needs it, but less is definitely more.  Taste to adjust for salt and pepper.  I like a lot of freshly cracked black pepper in my chicken salad.


Serve as a tea sandwich (described above) or spread on your favorite bread with some fresh romaine lettuce.


Add some fresh fruit and enjoy!

Friday, August 6, 2010

Maple Pecan Coleslaw

Posted by Head Fly at 12:11 PM 0 comments

So the title of this recipe may not sound 100% appealing to all of you; however this is one of my favorite coleslaw recipes of all time.  Even if you don't like coleslaw, I think you will find this one to be a winner.  The following recipe is my adaptation of a Nigella Lawson coleslaw recipe.  It's the perfect mix of sweet and savory.  A superb accompaniment along-side some smokey barbecue ribs or try it on top of a pulled pork sandwich - deeeeelish!!

Maple Pecan Coleslaw
Serves 8-12

Ingredients:
1 medium-size head of cabbage
4 carrots
3 stalks celery
6 green onions
1.5 cups mayonnaise
4 tablespoons maple syrup
4 tablespoons apple cider vinegar (you can use white wine vinegar or rice vinegar too)
1 cup pecans, chopped
Salt and Pepper, to taste

Directions:
Shred the cabbage.  You can do this with a knife or use your food processor.  You could also purchase pre-shredded coleslaw cabbage (though buying a head of cabbage is much more economical).  Place shredded cabbage into a large mixing bowl.

Wash and grate carrots.  Dice celery.  Slice green onions (white and green parts).  Place carrots, celery, and green onions in the bowl with the cabbage.

In a smaller mixing bowl combine mayonnaise, maple syrup and apple cider vinegar - stir to combine.  Pour dressing over the top of the cabbage, carrot, celery, green onion mixture and toss to combine.  Add chopped pecans and salt and pepper, to taste.  Toss again to combine.  


Allow to chill in the refrigerator overnight or for at least two hours to allow flavors to come together.


Cottage Mama's Note:  This is another recipe from Matilda's Summer Garden Party.  We used this slaw to top our pork sandwiches at the party - YUM!

Wednesday, August 4, 2010

Grilled Corn Salad

Posted by Head Fly at 6:28 AM 0 comments

It's corn season - yipppee!!  I love a fresh, sweet ear of corn on the cob in the summer.  Here's another recipe from Matilda's Summer Garden Party.  This grilled corn salad can be changed up with the addition of different herbs and vegetables, but the base always stays the same - amazingly delicious grilled corn!

Grilled Corn Salad
Serves 8

Ingredients:
6 ears of corn
1 jar of roasted red peppers
4 green onions, sliced
1/2 cup chopped fresh parsley
1 lemon, juiced
4 tablespoons olive oil, plus a little more for brushing corn
1 teaspoon sugar
Salt and pepper, to taste


Directions:
Remove the hull and silks from corn and wash thoroughly.  Brush with olive oil and sprinkle with salt and pepper.  Place corn on grill for approximately 8 minutes or until corn appears to be a medium brown.


Allow corn to cool.  Once cooled, remove kernels from cobs and place in a large mixing bowl.  Add one jar of roasted red peppers, chopped, sliced green onions, 1/2 cup chopped fresh parsley

In another small mixing bowl, mix olive oil, lemon juice (you can add some zest too if you really like lemon), and sugar - add salt and freshly ground pepper to taste.

Pour dressing over corn mixture and toss to combine.  Taste and adjust seasoning.  Like I've said before, if the pop of flavor isn't quite there, add more salt and pepper and taste again.  You can always add more salt, but you can't take it away.


Cottage Mama's Note:  I just made a variation of this salad that was great as well.  I used cherry tomatoes (halved) from our garden instead of roasted red peppers and I used cilantro instead of parsley.  This went perfectly with our beef and avocado tacos!!

PS:  So many of you emailed and asked for a tutorial on the Gathered Ruffle Camera strap that I will be putting one together for you in the coming week.

Tuesday, July 27, 2010

Loaded Potato Salad Recipe from Matilda's Summer Garden Party

Posted by Head Fly at 4:39 PM 0 comments

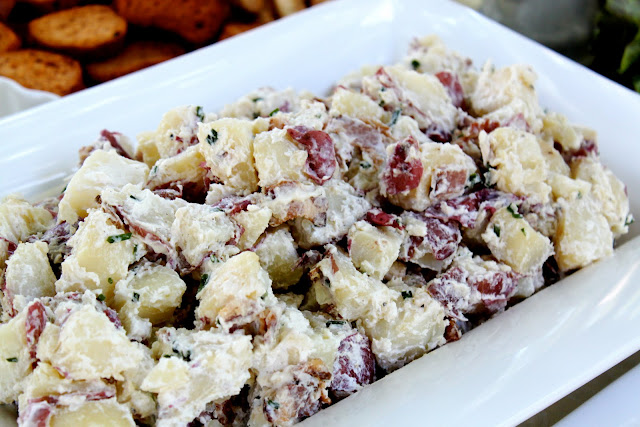
So, I'm finally getting around to posting some of the recipes from my daughter, Matilda's Summer Garden Party that we had earlier this month.  The first recipe I would like to share with you is my Loaded Potato Salad.

I get weak in the knees for a good loaded baked potato.  I mean I love the works - butter, cheese, sour cream, bacon, chives, salt and pepper - YUM.  A good, loaded baked potato was my inspiration for this wonderful potato salad.  Even if you don't traditionally like potato salad, give this a try - you might be a potato salad fan after all!


Matilda's Loaded Potato Salad
Serves 12

Ingredients:
2 pounds red potatoes, cleaned and cut into 1 inch chunks
1 pound of bacon, cooked and crumbled
5 green onions, cleaned and sliced
1 stalk celery, finely chopped
1 cup mayonnaise
1 cup sour cream
Salt and Pepper, to taste

Directions:
Bring a large pot of salad water to a boil.  Add potatoes cut into 1 inch chunks.  Cook until tender, but not mushy (it's very important not to over cook your potatoes).  Cooking time is approximately 15 minutes.  Drain potatoes, place in refrigerator to cool.


Meanwhile, cook your bacon.  You can cut it prior to cooking, as I have done here, or cook the strips and crumble them later (it's up to you).  Once cooked, crumble each bacon strip and set aside.  


Add mayonnaise and sour cream to a large mixing bowl and combine.  Then add green onions (or chives, if you prefer), celery, bacon, and salt and pepper.  Finally add your cooked, cooled potatoes (don't worry if they aren't totally cooled - that's ok) and fold ingredients together to combine.  Taste and then adjust seasoning.  

Place potato salad in the fridge for at least an hour to allow the flavors to come together.  This is definitely a great make ahead dish, so feel free to make this the day before your party or event! 
Enjoy!


Cottage Mama's Note:  If it doesn't taste quite right to you, it probably needs more salt.  I find that salt can make or break a potato dish - just the right amount and you can hit it out of the park, too little and your flavor will fall very flat.  Keep tasting and adjusting as you see fit.  Remember you can always add more salt, but you can't take it out.


Thursday, July 22, 2010

Marinated Fresh Mozzarella

Posted by Head Fly at 5:23 AM 0 comments

I love fresh mozzarella.  There really is no comparison to the stuff you buy in a brick or pre-shredded.  I love a good piece of crusty bread with sliced mozzarella, drizzled with olive oil and sprinkled with garlic salt - Yum!

When I want to take fresh mozzarella to the next level, I love to marinate them in herbed olive oil.  Have you seen the marinated mozzarella in the store?  It's pretty expensive in comparison to the regular un-marinated variety - usually about 2 times the price (if not more).  Marinated mozzarella is so simple to do at home at the fraction of the cost.

Marinated Fresh Mozzarella

Ingredients:
1 package medium size, fresh mozzarella balls
3/4 cup good olive oil
Herbs (fresh or dried) - oregano, thyme, basil, rosemary, parsley, ect..
Salt and Pepper, to taste
Optional: Red Pepper Flakes

Directions:


Drain fresh mozzarella.  Place cheese in a small container.  Sprinkle herbs on top.  This is where you can get creative - use what you like (fresh or dried).  If you have an herb garden go to town with fresh, if you don't, just use what's in your cabinet - it will be good either way.  If you like spice, add some red pepper flakes.  Sprinkle some salt and pepper (about a 1/4 teaspoon).


Fill container so mozzarella is covered.  You may use more or less olive oil depending on your container size.


Cover container with a tight lid and let sit overnight.


Antipasto platter from Matilda's Garden Party with Marinated Fresh Mozzarella

Cottage Mama's Note: Use this mozzarella on a beautiful antipasto platter (as seen above).  Or cook some pasta, let it cool and add the marinated mozzarella (with oil and herbs) to make a delicious pasta salad.  Or simply place cheese on a crusty piece of Italian bread and enjoy!

Sunday, June 6, 2010

Asian Slaw

Posted by Head Fly at 5:37 PM 0 comments

Several weeks ago, I shared my recipe for Jambalaya Egg Casserole that I served at my most recent playgroup.  With the casserole I served an Asian slaw and a pineapple salad - I shared the pictures, but not the recipes (I know, how rude of me!).  A couple people emailed asking for the recipe for the Asian slaw, so I thought I would share it with you all.

I love almost all Asian food (unless I can see the eyeballs) and I especially love things with peanuts.  This is a great dish to take to a potluck or for entertaining because you can make it ahead of time and it tastes great at room temperature.

Asian Slaw

Ingredients:
1 package Ramen noodles - Oriental Flavor
2 tablespoons peanut butter
6 tablespoons vegetable oil
1 teaspoon sesame oil
3 tablespoons rice wine vinegar or apple cider vinegar
4-6 cups shredded cabbage (regular green or napa) or 1 bag coleslaw mix
1/2 cup grated carrots
1 handful of roasted peanuts
2 green onions, sliced

Optional:  
Chopped cilantro
Sesame Seeds

Directions:

Crush Ramen noodles.  Use this time to take any aggression you may have in life out on your noodles. 

Mix oriental seasoning packet (from Ramen), peanut butter, vegetable oil, sesame oil and vinegar in a large mixing bowl - use a whisk or a fork.  I find everyone likes a little different consistency.  I like it to look like a salad dressing, so a little bit on the thin side.  If you need to thin it, add some hot tap water.  If you would like it thicker, add some more peanut butter.  

Add crushed Ramen noodles, shredded cabbage, carrots, green onions, peanuts, cilantro (optional) and a sprinkle sesame seeds (optional) to the dressing mixture.  Toss to combine.  Garnish with cilantro.

Place in the refrigerator until ready to serve.  Slaw can be made a day in advance (it actually gets better as it sits).


Enjoy!

Cottage Mama's Note:  This salad is also great without the peanut butter for a lighter slaw.  Substitute sliced almonds for the peanuts if you have someone with a peanut allergy.  Or omit the nuts all together.

Tuesday, April 27, 2010

Ginger Salad Dressing

Posted by Head Fly at 4:59 PM 0 comments

I just tasted this salad dressing two minutes ago and I am so excited that I had to sit down immediately at my computer to share!  

Do you ever go to those Japanese restaurants where they cook at your table?  You know......i.e. Benihana's or Kobe.  If not, they usually give you this delicious salad to start your meal with this amazingly delicious ginger dressing. 

Well, this is it - it's that amazing salad dressing!!

I almost lost my mind when I tasted this and even better yet - it's a "lite" dressing.  Wooohooooo!  I'm not much of a salad girl, unless it has buttermilk ranch dressing, lots of cheese, bacon and croutons and then what's the point, right?  But this stuff is great and would be so, so, so tasty as a marinade for grilled shrimp, chicken or veggies.  If you are at the store and you feel the same way about the Japanese salad dressing as I do, you must give this a try!

YUM!

Cottage Mama's Note:  If you don't live in an area that carries the "Annie's" products, click here to visit their website.
Related Posts Plugin for WordPress, Blogger...
 

home appliances Template by Ipietoon Blogger Template | Gadget Review