Showing posts with label this week we're eating ... Show all posts

Thursday, August 30, 2012

teenagers on holiday and french peach tarts

Posted by Head Fly at 10:40 PM 0 comments


Our short break in the South was spontaneous, hilarious and exactly what I needed after a long summer and before a busy fall.


Less than  a week before we left, I was still searching for somewhere to stay for ... me .... my dear husband ..... our four children ..... their friends .... and two dogs!!  YUP!

This holiday was meant to be.... as a few days before our leaving date, a huge house materialised, complete with a ton of bedrooms, a pool, space for the dogs to run around, easy access to a sleepy little village and bikes for everyone.  For a week we forgot about internet (well almost) forgot about the news, practically forgot about the car, and wandered from pool to table to river to pool to table in a happy haze.

If you are feeling weary, I can recommend no better remedy than heading off with a bunch of youngsters aged between 15 and 21. 


Why was it such a good idea to holiday with teenagers?  

Because they just wanted to relax. 
They liked to smile and laugh the whole time.  
They were not picky - about anything! 
They got up late, which meant I could have a first breakfast and cup of tea alone on the terrace MMMM....
They listened to a most eclectic selection of music, and the house was filled with 
jazz, rap, reggae, rock and classical airs all day long
They let me beat them at cards and at tennis! (OK so they are very polite kids)
and whatever I put on the table was immediately devoured! 

Which brings me neatly around to a favourite summertime dessert

LE peach tart, a feast for the eyes, and super quick and easy to put together.

These are more photos taken by Ella, great pictures in a not so pretty baking tin, plus the tart was left a few minutes too long in the oven, but hey!  these things happen... and there was definitely no tart left by the end of the meal so it can't have been that bad!


To make a peach tart for a bunch of hungry teenagers, first make a delicious sweet pastry, I'm sure you have your favourite recipe, I like mine rich in butter, sugar and maybe some ground almonds.

If you are feeling like a saint, you'll blind-bake your pastry base.  This is a good investment of time, because the peach gets so juicy, if the pastry isn't pre-cooked, it will just go soggy.


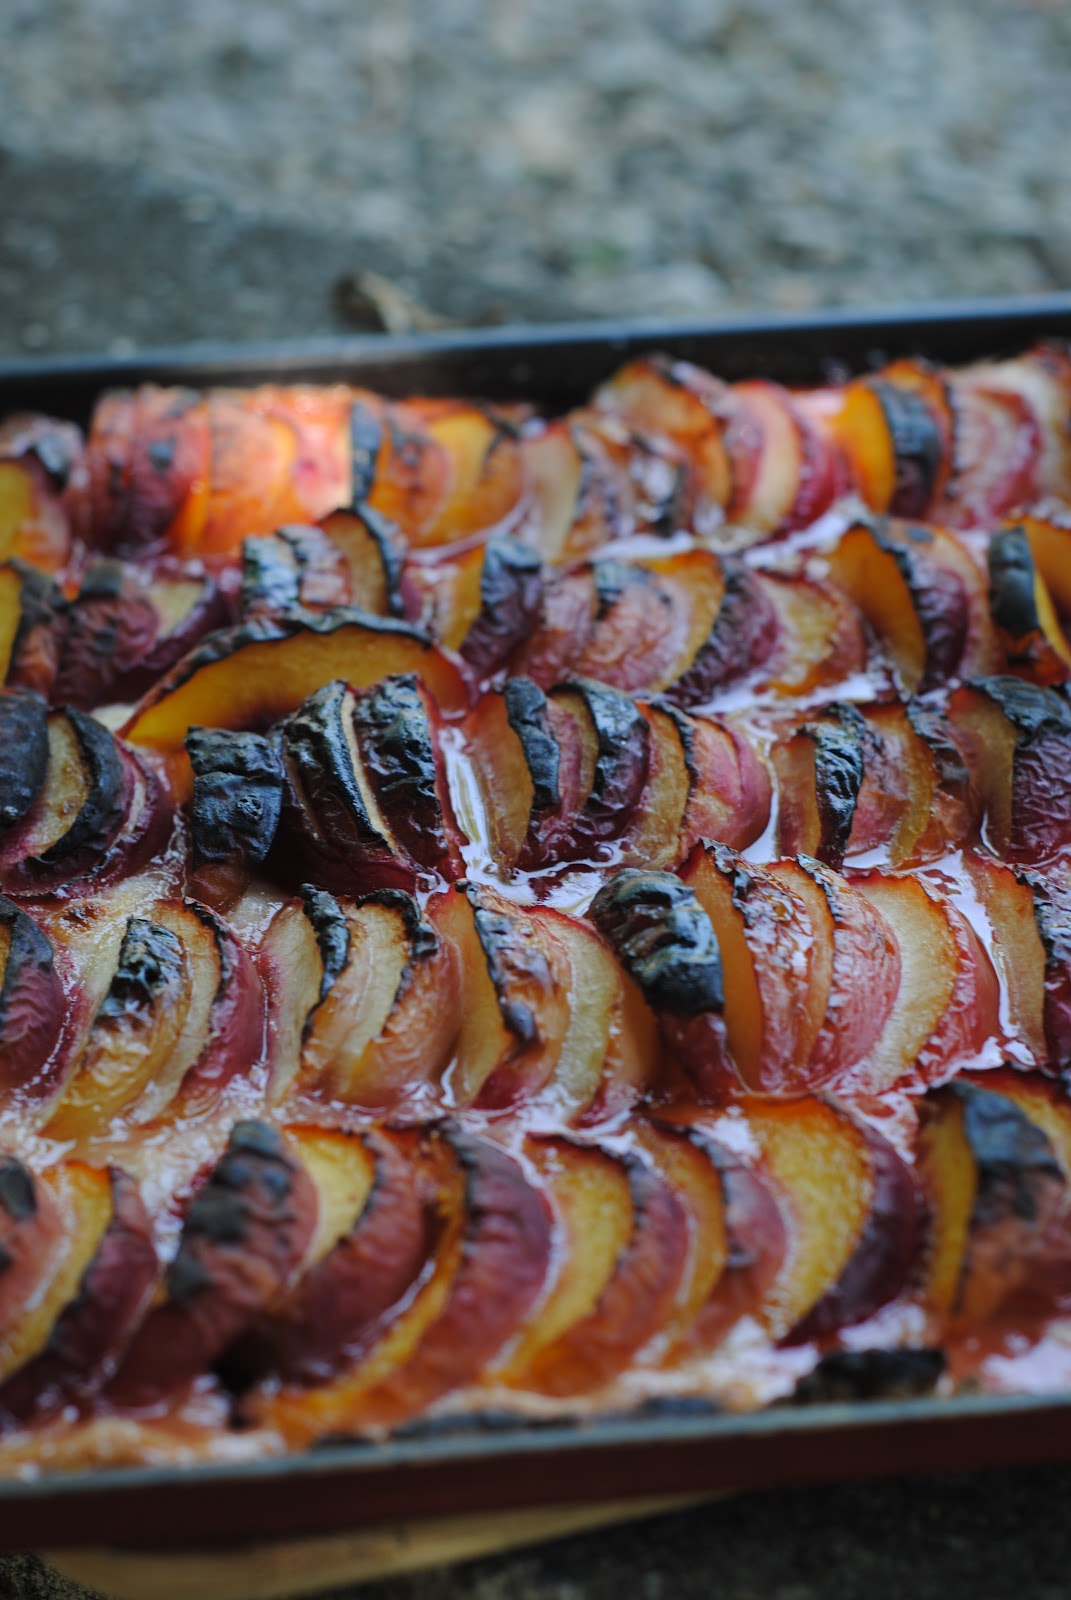
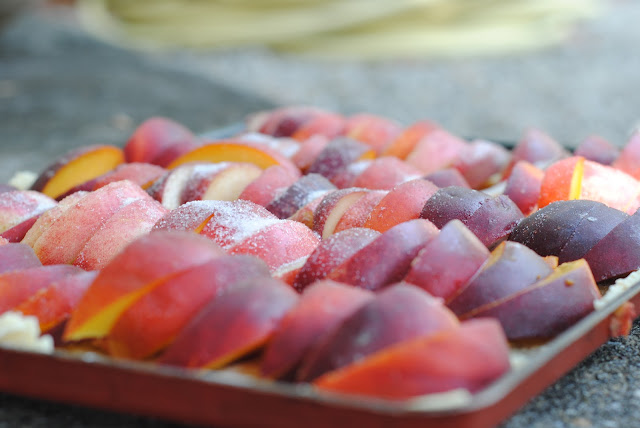
While the pastry is in the oven, pour yourself a glass of wine, press PLAY on anything by Bob Marley and wash and slice your peaches.  I don't even skin them, because the fruit looks prettier with the skin still on (even if you go for this year's fashionable char-grilled look !!)

Take the pastry out of the oven , choose another CD,  sprinkle a little sugar over the base, quickly arrange the slices of peach, sprinkle more sugar and pop the whole lot into the oven.

Keep an eye on the tart  because there is a danger of it - ahem - caramelising.  I'd say about half a CD and two glasses of wine and the tart will be done!

Voilà  - I hope you also have some happy carefree moments to remember from the summer.  Thank you for reading me!


Friday, August 10, 2012

blackberry and mint sorbet

Posted by Head Fly at 9:48 AM 0 comments


via


Our blackberries are beginning to fruit, and before I start into the real jam season, I love to play around with desserts.  Crumbles obviously are high on the list, blackberry and apple, or blackberry with other red fruit  YUMM....


via


 But this year, I wanted to be a little braver and have started making the most wonderful black berry and mint sorbet.  This has been devoured here several times over the last fortnight, but each time I forgot or missed the moment for pictures, so these shots are borrowed from Google. (thank you!)


via


To make enough sorbet for 6 people, I first freeze about 6 cups of fresh blackberries.

Then I make a light syrup using 1/2 cup of sugar and 1/2 cup of water.    I drop a couple of handfuls of fresh mint into the pan containing the sugar and water, and bring everything to a boil.  As soon as it boils, I turn off the heat and let the syrup cool down.  This step could easily be done the day before.

I am also informed that lavender works very well in the place of mint.

When ready I strain out the mint leaves and pour the delicious smelling syrup into a shallow tray, and pop it in to the freezer.

The next step depends on whether you have an ice cream maker, and also how smooth a texture you wish the sorbet to be.

 For a reason I have yet to understand, I do not have an ice cream or sorbet machine. 

 I am also happy to have a little fruit texture in the sorbet.


via


I therefore pop the frozen berries and almost frozen syrup into a blender and whizz away for a few minutes.  When I think it is blended enough, I pour the mix into a deep tray and return to the deep freeze.  Every 30 minutes I remove the tray and stir it well with a large spoon.  After four stirs I declare my sorbet 'done' and leave it in peace in the deep freeze until we are ready to scoop out tasteful little balls of sorbet into tiny bowls.  Add a couple of fresh berries for decoration, and a snippet from a passing mint leaf and I am in business.

I'm telling you: this is a breeze, and  -  providing nobody spills sorbet down their new white linen trousers (let's not go there !)  -  it is a dessert that is generally acclaimed by all and sundry.

One day, when I grow up, I shall attempt this rather wonderful looking swirly combination of blackberry sorbet and vanilla ice cream, and that really would impress!


via


Wednesday, July 18, 2012

deep fried zucchini flowers or beignets de courgettes

Posted by Head Fly at 2:00 PM 0 comments


When the potager is producing baskets of courgettes or zucchini, and the weather is fine, my family love to see beignets de fleurs de courgette, batter fried zucchini flowers on their plates.


This is another of those simple family favourites, easy to put together that I favour so much, especially at this time of year when I never know how many people will turn up for lunch or dinner!


To make about 15 batter fried zucchini flowers, first find your flowers!  If you have a potager, then pick the flowers first thing in the morning.  Otherwise find yourself a good supplier who can produce fresh flowers.


The batter is pretty easy to make.  You will need:

oil for frying
200 gram or 1 1/2 cups of flour
3 eggs
20 g or 2 tablespoons of dried bakers yeast
glass of warm water 
salt and pepper


Dissolve the dried bakers yeast in the glass of warm water.  Put the flour into a large mixing bowl, add salt and pepper and drop the eggs in to the centre.  Using a whisk, start to mix the eggs into the flour, then add the dissolved yeast and beat well until totally combined.

Leave the batter to rest for an hour.

Check the flowers to make sure they are clean and remove the central pistil, and cut the stalk off fairly short.

The battered courgettes are best eaten hot, so don't start cooking until shortly before your meal.

Heat the oil in a deep pan.  Gently dip each flower onto the surface of the  batter, rolling it a little, so that the flower is well covered.  Lift and place carefully into the bubbling oil.   Repeat for all the flowers, turning them over so they are golden brown on all sides.

Before serving, lay the flowers on absorbent paper for a few minutes to take away any excess oil.  Once on the serving dish, sprinkle with a little salt.


If you find yourself with more batter than required for the flowers, simply slice a couple of zucchini, coat them in the batter and deep fry them too.  

I even use my last drops of batter to deep fry sage leaves, fantastic nibbles with a glass of wine!

bon appetit!


All pictures thanks to Google images


Saturday, June 30, 2012

strawberries and cream

Posted by Head Fly at 4:47 PM 0 comments


Strawberries and cream - three little words that evoke summer, in all its deliciousness

Last week we were invited to a big lunch party, where the hostess was happy to accept some contributions for dessert.  We were eating outside, milling around, fairly casual, so I thought that  individual desserts could be the way to go.


I put together these little 'verrines'  (French for mini portions in glass tumblers).  They could not be simpler,  all you need is fresh strawberries, whipping cream, tiny meringues and a sprinkling of sugar.

Having washed and hulled the strawberries, I took a handful and blended them in a bowl with some sugar to taste.  This makes the  fresh coulis that gives a pop of colour at the base of the verrine.   Of the remaining strawberries, some were left whole and some were sliced.


I beat the whipping cream until it would hold in soft peaks.  My meringues came from our local baker, who sells his home baked meringues in small packets, and they are so pretty and regular in their size and shape that I don't see the point in making them myself.  For this dessert, some meringues are left whole to decorate and the rest are cut or broken into pieces.


To assemble the verrines, simply pour a little coulis into the base of the glass, followed by some broken meringue.   Carefully spoon in some whipped cream, then a few slices of strawberries.  Another dollop of cream, a final spoonful of coulis, a beautiful little strawberry and a perfect meringue sitting on the top and you are done!   

These can be made ahead of time, they'll sit in the fridge quite happily for hours before your meal, they could even be made the day before if you are pushed for time.


So when it came to bringing my dessert to our friends I decided to have some fun, they all looked so pretty in a row.  I laid them out on an old French teacloth, with a red monogram in the centre, to match the  strawberries.   The overflow of strawberries were piled into a small tureen from my collection, and I took them over with some roses cut from the garden just before we went.


What can I say?   I have such fun putting together a few pretties, especially when I can gift them to a friend.


I wish you all a wonderful weekend, whether you are at the height of a hot summer or heading into fall, may you find something lovely to share with a friend!


Monday, June 18, 2012

cannelés - a sweet speciality from south west france

Posted by Head Fly at 10:30 PM 0 comments


A couple of lovely readers have asked me about these tiny copper moulds,  that I found in the fair yesterday. They are quite old and were purpose made to bake the delicious Cannelés!


Before I go onto the recipe, your opinion please.  I bought a few of these, for me and for the store, but I can't decide whether to clean them all.  Of course they are clean inside, but do you prefer the tarnished patina look or do find the sheen of polished copper irresistible?! Thank you!


These little cakes are a speciality of South West France, Bordeaux in particular, and for many people they represent a summer pleasure, enjoyed while on holiday.

They have a slightly thick and caramelised crust but inside they are moist


Ingredients to make about 12 cannelés

- 1/2 litre (2 cups) milk
- 25 g butter (2 oz)
- 2 egg yolks
- 1 whole egg
- 250 g (1+1/4 cups) sugar
- 125 g flour (1 cup)
- 1teaspoon vanilla essence, or the grains of a whole vanilla pod in the milk
- 60 ml (1/4 cup) rum


Boil the milk (with the vanilla grains if you are using a pod) add the butter and leave to cool.
In a large bowl beat the egg yolks, the whole egg and the sugar.    Add the flour, mix well then little by little add the milk.  Add the rum, and the vanilla essence if using it.  The mixture should have the consistency of pancake batter.  Leave overnight in a bowl in the fridge.
Fill the moulds to 3/4 level.   Cook for 15 minutes at 450°F (250°C), then drop to 355°F (180°C) and cook for an hour.


via


Instead of making this size cannelés, you can also make mini versions which only need about 40 minutes to cook.
Turn them out while they are still hot and - if you have the will power! -  leave to cool before eating.


via


                                                                     bon appétit mes amis!


Tuesday, June 12, 2012

eating cheese soufflé

Posted by Head Fly at 11:20 PM 0 comments


One of my earliest memories of life in France, is culinary!  No surprise there!   I  was in France as a young girl on a school exchange, and one Sunday we visited the home of my penfriend's grandmother.  Sunday lunch, tall forbidding house, beautiful antique furntiture and a maid to serve at the table.  I felt quite nervous.

We, the children, were ushered into the garden while the grown-ups talked inside and probably enjoyed an aperitif before the meal.    I remember vividly that there was suddenly a flurry of activity and my penfirend said "quick quick we have to go to table straight away, we cannot keep the cheese soufflé waiting!"

"Cannot keep the souffle waiting??!! "  I didn't even know what a soufflé was, let alone understand why it was so revered!


We hurried into the huge dark dining room at sat at a table that seemed to be a mile long.  The austere grandmother at the head of the table.  Hardly anyone spoke.  The door pushed open and in came the cook carrying LE SOUFFLE!  There were groans of pleasure and anticipation from around the table, followed by a long, typically French, discussion about the best cheese to use, how long it should be cooked for, the risk of the soufflé 'sinking' as the cook trotted up the corridor from the kitchen ....

This to me was a new world where priorities were different to those I had grown up with.  It was just the beginning of a lifelong fascination with French living.

Cheese soufflé remains one of my very favourite dishes.  Served as a first course for a dinner with friends, or with a salad for a lunchtime snack with a girlfriend, it is delicious.

Here is my favourite recipe, you are welcome to try.  I'd love to hear what you think.


For 4 people you will need

almost 3 cups of grated cheese
pinch nutmeg
1 clove garlic
5 eggs
1/4 cup butter
good 1/3 cup flour
1/4 cups milk

Butter your baking mould, or moulds if you want to make individual souffles.  Dust lightly with flour.

1 hour before serving time, melt the 1/4 cup butter in a heavy pan and add the flour, stir for a minute.  Pour the milk in little by little, stirring all the time.  Add the pressed garlicm the nutmeg, salt and pepper.  Add the grated cheese, don't stop stirring.  When all the cheese is melted and everything well mixed in, you can turn the heat off and leave the mixture to cool a little.


50 minutes before serving time (I told you this was a precison dish!)  heat your oven to 180C (gas mark 4).  Add the yolks of the eggs to the mixture, making sure they are thoroughly blended in.

Beat the egg whites with a pinch of salt until stiff.   Add two spoons of egg white to the mixture and beat in well.  This is just to loosen the mixture a little.  Add the remainder of the egg whites, turning the mixture gently to keep as much air trapped as possible.

40 minutes before serving time, pour all the mixture into the prepared mould or moulds.  Pop straight into the oven.     If you are cooking individual souffles then cook for about 30 minutes, for a large souffle cook for 40 minutes.    If you have a glass window to your oven door you'll see the souffle rise above the edge of the mould.  Resist opening the oven door during cooking!


They should sound hollow when tapped on the top, but still move a little in the centre, you don't want a souffle that has dried out! 

Just before serving make sure everyone is sitting down and ready.  You want them to appreciate the risen golden brown crust to the souffle and sigh with delight as you cut into it to serve!

Bon appetit mes amis!


Monday, June 4, 2012

making strawberry jam

Posted by Head Fly at 1:38 PM 0 comments


Now that our local strawberries are ready, I shall be making a big batch of strawberry jam , mmmmm...... strawberry.... jam....., surely two of the most evocative words in the culinary language.  Strawberry jam is summer in a jar; it is scones for tea;  fresh croissant for breakfast;  it is the jam that takes us back to our childhood.....


By a happy coincidence it is also one of the easiest jams to make, the natural pectin in the little ruby red fruits ensuring a jam that sets easily without needing to be overcooked and risking spoiling the flavour.


At home we grow our strawberries in large pots on the terrace, they are easier to control and less of a temptation to passing birds!


To make quite a few pots of fresh jam you will need  5 lbs of tasty strawberries, 3 lbs  (6 cups) of sugar and the juice of a lemon or two.

Pop a couple of old saucers into the freezer, you will need these for testing whether the jam is set.  Also have your jam jars ready, squeaky clean and slightly warm.

Remove the stalks and cut up the strawberries, pop them into a saucepan with the sugar and the lemon juice.  I leave this for a couple of hours so the fruit begins to juice.

Turn on a gentle heat until all the sugar is melted.  Once everything is melted then turn the heat up and bring the mixture to a boil.  Let it boil (not too hard) for 10-15 minutes.  After about 10 muinutes put a little of the mixture onto one of the cold saucers and do the 'wrinkle' test.  If, when you push your finger against the blob of jam the surface crinkles, then your jam is ready.  If it is still liquid then you need to boil it for a few more minutes.

The less time your jam boils, the better and fresher the flavour will be.

When you are satisfied with the consistency, turn off the heat, let the jam cool for a while.  Pour into individual pots and seal.  When the pots are cooled, wash them carefully to make sure no jam has dribbled down the side, then stick on a pretty label.


Voila!   my favourite recipe, illustrated by a series of wonderful  pictures taken by my daughter Ella last summer, enjoy!


Wednesday, May 23, 2012

eating well in May - a gazpacho

Posted by Head Fly at 1:12 PM 0 comments


May in France is the month of long weekends, bank holidays,family get-togethers with the inevitable never-ending  meals.


It is also the time of year when summer is looming large and we are glad to have put heavy winter meals behind us.  So what sort of thing do we like to serve at a spring family reunion?

One of our favourite summer dishes is a gazpacho.  More spanish than French, but easy to prepare and popular with most people.

No cooking required but definitely need a mixer.  I love this dish because it is healthy, quick to prepare providing you start the day before, bright in colour and infinitely adaptable.


I have experimented with quite a few combinations of ingredients, but here is this year's favourite.  Quantities are for 4-6 people.

Cut up 4-6 large ripe tomatoes, an onion (I prefer red) a clove of garlic, a red pepper, a cucumber (peeled) and a few sprigs of chives.  Put them in a bowl with a pinch of salt and a pinch of sugar and leave in the fridge overnight, or for at least 6 hours.   Put about 300 grammes of white bread into a bowl with enough water to half cover.

When you are ready to mix, squeeze the water out of the bread and throw it into the mixer along with all the prepared vegetables.  Start whizzing, and as it comes together trickle olive oil into the mixture.  You will add at least 100ml of oilive oil, so make sure it is a good quality oil.

Adjust the seasoning, you can add some tabasco and you may need some more salt and leave in the fridge until you are ready to eat.


This soup looks spectacular served in individual portions, maybe with some toasted croutons, personally we like a little grilled chorizo sausage crumbled over the top!

Bon appetit mes amis!


photos thanks to google images


Tuesday, May 15, 2012

French asparagus season

Posted by Head Fly at 12:30 PM 0 comments


It is asparagus season, and our local farm is selling out so fast that if I  want a bunch or two I have to reserve!!


Asparagus in France is traditionally steamed, and often eaten as a first course with a vinaigrette, but this year we are eating our asperges sautéd, or lightly fried.    The green or violet varieties are better than the white for this, but it is a quick and delicious vegetable, ideal for accompanying a risotto, or served with thinly sliced parma ham.


I don't have any asparagus growing in the potager, I should remedy that soon.


To prepare asparagus as we do, snap off the lower part of the stem with your fingers, and if necessary peel away the very thin outer fibre of the stem, up to the tip.  Rinse in cold water, then cook in a pan with a little olive oil, and a heavy lid over the pan to keep in the moisture.  After 10-15 minutes the asparagus should be tender and just beginning to brown.

Do you eat asparagus in your part of the world?  What is your favourite way to prepare it?  I'd especially love to hear if you grow your own, did you find it easy?  Merci et bon appetit!

PS  Since quite a few of you seem to grow the stuff, how many asparagus plants are needed to provide a couple of bunches a week?  Merci!


all photos thanks to google images


Related Posts Plugin for WordPress, Blogger...
 

home appliances Template by Ipietoon Blogger Template | Gadget Review