Friday, March 26, 2010

Boys.........

Posted by Head Fly at 8:12 PM 0 comments

If you have been following my blog here for very long, you know that most of the things I post about (when it comes to children) has to do with girls.  I'm sorry, I can't help it, I have two of them!!

Well, I have been working on some birthday presents for my daughters little friends and they happen to be mostly............boys.  I love to make Savannah's little friends handmade gifts for their birthdays.  Now it is not always possible to make ALL of them totally handmade, but I try my best.

I'm a huge fan of making super-hero capes for the little ones, but here are some other gifts I made recently that will be given to my daughter's 2-year old "boyfriends".

The Car Cozy:
 I love this gift idea!  I think this is so perfect for a little guy on the go.  Mom can take this simple "Car Cozy" in her diaper bag or purse and whenever she needs to entertain the little guy, she can pull it out and he can have instant fun! 

I based this design off of the "Car Cozy" tutorial by Homemade by Jill.  So if you are interested in making this gift for someone, I definitely recommend checking out her tutorial - it's great and very thorough.  I did change it up a bit, so I'll let you know what I did.

As you know, I love toys that encourage imaginitive play and this one is perfect.  You've got the street and the different cars - so much fun!

I used brown and yellow felt to make the road.  And used Riley Blake's new "Wheels" line for the fabric to hold the cars.  The light khaki color is a thick cotton twill.


I appliqued a car out of fabric (again, Riley Blake "Wheels") and sewed wheels made from felt to the exterior of the "Car Cozy".

For the exterior, I used a thick denim.  This would be a great idea for recycling a used pair of jeans that you are no longer wearing.

To speed up this project, I used my serger to sew around the entire exterior.  Homemade by Jill's tutorial does not use a serger.  I know many of you don't have a serger, but if you do, I think this is the way to go!


For the tie, I used two pieces of felt ribbon that I got at my local Michael's.

To close the "car cozy" you fold it in half (as you can see, I included my "The Cottage Mama" label).

Then you fold it in half again and secure with the tie.

 I think any little guy would be thrilled to receive this gift - Vroom, Vroom!!!

Charm Square Car Bean Bags:

I included these four bean bags in one my my daughters friends gifts.  The main portion of the gift was a tote with a bunch of outdoor sand toys and I thought these bean bags would make for some additional outdoor fun!

These four bean-bags were all made from charm squares of fabric.  I made one side from Riley Blake "Wheels" fabric.

And on the other side I used a fun polka-dot in "boy" colors.

Again, if you have a serger this makes for a super-simple project.  Just serge three sides of the fabric together, fill with beans, and then serge the fourth side.  I finished all of the corners with fray-check to prevent future fraying.

If you do not have a serger, place the right-sides of the fabric together and stitch three sides (1/2" seam allowance), then turn them right-side out and press your seams.  Fill with beans, and hand-sew the fourth side to close the bean bags.

I used an entire bag of beans for these four bean-bags.


Cottage Mama's Note:  Since this wasn't a full tutorial, if you have any questions about these gifts, feel free to leave me a comment or send me an email.

better after

Posted by Head Fly at 6:42 PM 0 comments

a big thank you to lindsey from the blog better after for featuring charm home on her blog.  she posted pictures of a changing table transformation from a nursery that i’ve been working on for a good friend and client of mine. 

THANKS LINDS!!!

you can see her post here.

updates 007

LiveJournal Tags: ,,


loving…

Posted by Head Fly at 6:15 PM 0 comments

1.  this lafayette chandelier from pottery barn.  simply beautiful.

image image

2.  this “kitchen love” post from paloma at la dolce vita.  so many great kitchen pics in one spot.

kitchen style at home eoskitchen country home

images la dolce vita

3.  this chalkboard decal from chiasso.  if you’re scared to used chalkboard paint on your walls then this is the perfect alternative.

image

4.  i’m not loving this sofa from cb2 but i’m really, really liking it.  it’s definitely growing on me especially since it’s 40” deep.  this could be a really close contender to the one i posted last week that i want for our living room.

image5.  this amazing artwork from restoration hardware by atlanta-based artist todd murphy.  todd is actually a friend of a friend of mine.  i’ve never met him though.

 Dress Straw Artwork by Todd MurphyElephant Straw Artwork by Todd Murphy

Goose Straw Artwork by Todd MurphyHorse Straw Artwork by Todd Murphy

Wednesday, March 24, 2010

Pretty Scrapbook Paper Covered Magazine File ~ Tutorial

Posted by Head Fly at 7:37 PM 0 comments

I'm in the midst of needing to re-do my sewing/crafting/office space - it needs it - desperately!!  If you came into my house right now I would be so embarrased.  I have a gazillion yards of fabric everywhere and have taken over the entire dining room and office.  I am the type of person that needs my space to be organized and put together in order to feel like I can move ahead and create.......well right now, I should be at a stand-still because it is a disaster!

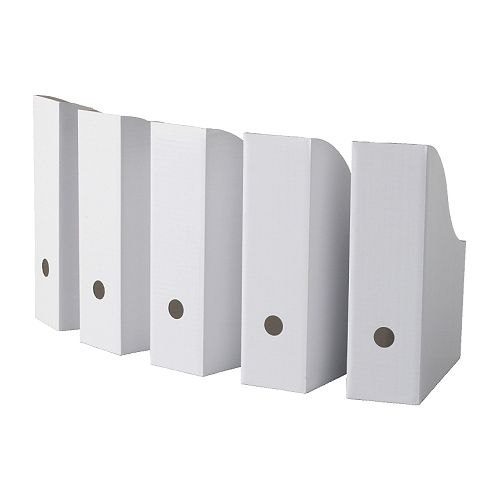
So in an effort to start to re-do my "studio" (that's what we'll call it.......sounds good, right?), I decided to start with an easy project.  Several years back I had purchased some inexpensive cardboard magazine files from IKEA - these to be exact:

They are only $2.99 for a pack of 5 - a bargain!!  But look at them.......they are screaming for some color.  So here is my overhaul project for these great deal, but not so pretty, magazine files.

Pretty Covered Magazine File Tutorial

Supplies:
-Magazine files
-Pretty scrapbook paper
-Glue
-Scissors or a paper cutter
-Pencil or pen

Directions:

Grab your scrapbook paper.  I used Amy Butler's scrapbook pack so that I would have a bunch of designs and colors that all coordinate and you know how I feel about Amy Butler (love her)!

Get out a sheet of 12 x 12 paper.

Flip your paper over and trace (with your pen or pencil) around the long-side of your magazine file.

This is what it will look like after you have done your tracing.

Use your paper cutter (or scissors) and cut out what you traced.  If you don't have a paper cutter, I highly recommend getting one.  They are pretty inexpensive (especially if you use your 40% off coupon at Joann's or Michael's) and if you plan on doing much crafting at all, it is well-worth the money.

Here is your long front piece cut out and ready to go.

Take your glue and place it all over the side of the file and place your long piece on top (be sure to line it up perfectly).  I just used your basic glue, but the stronger the better.  Another idea is to use Mod Podge for this project - if you are into that sort of thing.

Now you could stop here, as you really will only see the front of the file if you keep these in a bookcase, but I decided to take it a few steps further and cover the entire file box.  For the sides trace each one on another piece of scrapbook paper.

Use the first one you cut out as a template for your second.  You need two in order to cover both sides.

Again, swirl glue all around the side of the file and place your pretty paper on top.

For the other small piece, use a scrap from the first long-piece we cut.   Trace the same as the other pieces.

Here is what the smaller side of the file should look like.

To add your labels, I cut small pieces of neutral cardstock (approx. 1" x 3") to back my printed labels.

For the printed part of the label, I used my label maker (oh how I love my label maker!), but if you don't have one, just print your text out on your computer or hand-write it.

Place your labels all at the same height on the long-side of the file. 

Here is what your pretty magazine file will look like after it is complete.  Looks like it cost a lot more than the 60 cents that I paid for each file, right?

Here are some more files that I did as well in coordinating Amy Butler scrap paper.


These files just make me so happy, now if I could just get the rest of my "studio" to make me this happy!!
Related Posts Plugin for WordPress, Blogger...
 

home appliances Template by Ipietoon Blogger Template | Gadget Review