

A job well done is something that can't be kept a secret! That is why 97% of people who use Glidden Paint would recommend it to a friend. Glidden makes it easy to add a little color to your life, and why wouldn't you want to share that!? And go ahead -- brag a little (we don't mind), you earned it. In the meantime, check out Glidden's new commercial.
When Glidden asked me to check out this video, I thought, hmm, a video about paint, how fun could that be? I was wrong, this video totally made me smile and want to remind you how paint can make a huge difference in your home. With a little elbow grease and a weekend, you can create a whole new look in your home. Go ahead, paint.
And hey, who doesn't like dancing nuns?
*Disclaimer: This post has been sponsored by Glidden, but all thoughts are my own
Showing posts with label Paint. Show all posts
Showing posts with label Paint. Show all posts
Thursday, July 12, 2012
Tuesday, July 10, 2012
{ Painting the Shutters }
A few weeks ago I made shutters for our house.
I finally got around to painting the shutters.

I wanted a a color that I could stain to make it the perfect shade of aged copper.
Here goes.

I tried using a paint sprayer, but that was a complete failure.
The sprayer was a hand me down from a friend. I think it was about 20+ years old
with dried paint in the nozzle to prove it.

So, I went ahead the old fashioned way with a brush and a roller.
There are only 10 shutters (so far), so it wasn't to bad.
Here's the winning color....

Here are the two shutters side by side.
I like the shutter without the stain too, only not for my style house.
May be if I had a house at the beach I would use this color without the stain.

Here's the process I used to stain the shutters.
I used Annie Sloan dark wax.
I applied it with a brush and a little pencil.
I used the pencil to get deep into the groves of the shutter.

I brushed the wax on the shutters with the grain of the wood.

Then I smudged and rubbed with a soft cloth all over the shutter.

Here's the before picture of the shutters. (minus one, obviously)

Here's a little trick I used for hanging the new shutters without having to drill new holes into the stone.
I laid the old shutter on top of the new shutter and pushed the screw through the old hole to make a mark in the new shutter where the screw should be.

I hope that makes sense (?)
Here we are half way there.
What an improvement, eh?

And, with both shutters attached.

linking to

Tuesday, July 3, 2012
{ Annie Sloan Green Door }


and after, with a base coat of AS green and a top coat of
a custom mixture.


A while back I striped the foyer ceiling,
added burlap to the walls and wallpapered
book pages to the stair wall.

I love the green in the kitchen as well.
It looks great with the blue ceiling and mocha walls.

Another AC chalk paint project , checked off the list!
linking to

Wednesday, June 27, 2012
{ Camille's Annie Sloan Purple Dresser }
I promised Camille a new dresser in her room. (which you can see here)
She was dying for purple.
I was not.

Well, thank you Annie Sloan chalk paint, 'cause I found the perfect shade by mixing Duck Egg Blue with Scandinavian Pink and a dash of Old Violet.
Now we're both happy. It's the perfect shade of lavender.

I keep the handles exactly how I found them. Some weird mint green color.
(And I have no before, because, if you follow this page you know I'm a spaz and have no time for "before" photos. Most of the time.)


The photo block is from my friend, and artist Michelle Ciarlo-Hayes, I LOVE it and so do my girls.


Her knick knacks and hair accessories are kept in a two tiered cake plate thingy I made with a green depression glass candle stick and mini cake pans.


If she actually keeps her clothes in it, I'll remain happy.
She was dying for purple.
I was not.
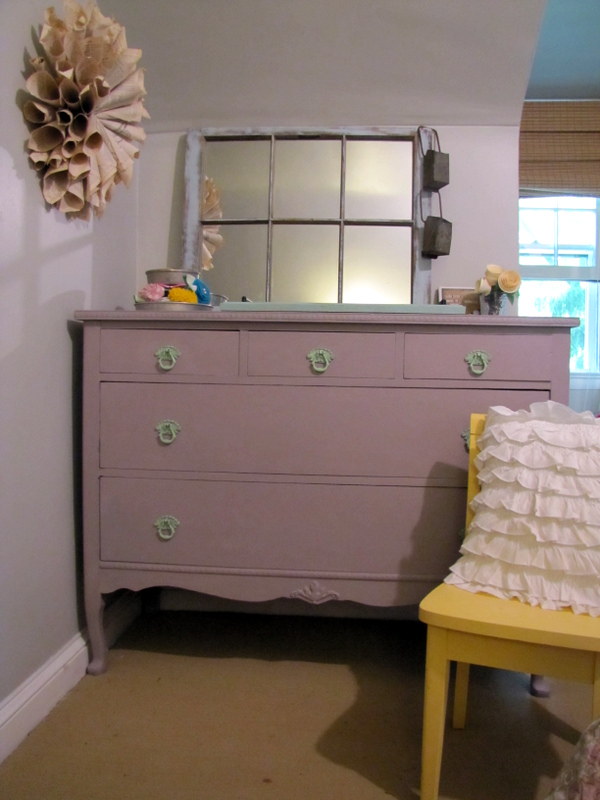
Well, thank you Annie Sloan chalk paint, 'cause I found the perfect shade by mixing Duck Egg Blue with Scandinavian Pink and a dash of Old Violet.
Now we're both happy. It's the perfect shade of lavender.

I keep the handles exactly how I found them. Some weird mint green color.
(And I have no before, because, if you follow this page you know I'm a spaz and have no time for "before" photos. Most of the time.)


The photo block is from my friend, and artist Michelle Ciarlo-Hayes, I LOVE it and so do my girls.


Her knick knacks and hair accessories are kept in a two tiered cake plate thingy I made with a green depression glass candle stick and mini cake pans.


If she actually keeps her clothes in it, I'll remain happy.
Sunday, March 4, 2012
{Faux Brick Walkway}

I also received many questions about it. So, here's a mini tutorial on it. It's easy and adds a little fun to the house. Good luck to anyone who takes this project on at their own house. And, please send me after pics!
1. I power-washed the walkway and paint it a "cement" color ~
(sorry I don't know the exact color, my cans are so messy, I can no longer read the labels.)

2. I bought 2 colors of brick , one light, one dark. Floor & Patio paint

3. Pour both colors into a paint tray and swirl them together with a paint stick. You want to create a swirly look, not mix the 2 completely together.
4. Purchase a touch up roller. They're are around $2.50 in the paint isle. They are tiny little 3" rollers, and are perfect size for a "brick". (sorry , no pick of the roller, but I trust you know what 3" looks like)
5. Roll your roller around in the swirled up paint, roll it about 5" on the fresh "cement", and voile-la! A brick is born!

6. It took me several days to finish this project. So, ever time I pour paint into the paint tray and swirled it around, I got a completely different shade of "brick"...this is a GOOD thing. you want your "bricks" to have various shades of color. The more perfect you try to do it, the worse it will look.
So, chill, enjoy the fresh weather, and paint away.
Ever now and then, I would go back to the previous days work and slap a coat of paint over a few "brick"s. This will mix up the brick colors a little and make it look more realistic.
I would also highlight some of the bricks with a coat of the lighter brick color.


oh, and be prepared to look out front of your house and see strangers standing in front of your walkway pointing and talking about the bricks, it's a hoot!
Good luck with your "brick" project, can't wait to see!
linky to
&
&
Tuesday, October 18, 2011
{ ScotchBlue Painting Party }
Welcome to the ScotchBlue™ Painting Party! You’re just in time, because you’ve entered at the start of the party! A group of fantastic DIY bloggers, including myself, all completed projects with the help of ScotchBlue™ Painter’s Tape with Edge-Lock™ Paint Line Protector. Now we’re giving you the chance to read all of our tutorials, gather inspiration, have fun and win prizes! Check out my project tutorial below, and then jump to the next blog in the party to see even more inspirational DIY tutorials!
I'm starting off the party with my striped ceiling in my foyer...


I let it dry overnight, then I made small pencil marks.
I used a triangle to draw the line from the pencil mark, across the ceiling.
(I suggest doing a small room if this is your first time striping a ceiling)

I used a level (but you could use a board or anything long and straight) to carry the line across the ceiling.


I used small pieces of tape to mark where I SHOULDN'T paint.

Painted and ta-da!


 *ScotchBlue Brand reached out to me to participate in the ScotchBlue Painting Party to celebrate the launch of their new ScotchBlue Painter’s Tape with Edge-Lock Paint Line Protector. My post represents my honest experience with ScotchBlue Painter’s Tape. I am not being paid for my answers, but I did receive ScotchBlue Painter’s Tape to assist in completion.
I'm starting off the party with my striped ceiling in my foyer...

I'm so happy with the results.
Here's how I did it...
First I painted a base coat.

I let it dry overnight, then I made small pencil marks.
I used a triangle to draw the line from the pencil mark, across the ceiling.
(I suggest doing a small room if this is your first time striping a ceiling)

I used a level (but you could use a board or anything long and straight) to carry the line across the ceiling.

Then, I used Scotchblue Painters Tape to tape on the lines across the ceiling.

I used small pieces of tape to mark where I SHOULDN'T paint.

Painted and ta-da!

Here's how the foyer looked before the striped ceiling...


Subscribe to:
Posts (Atom)

 HyperSmashPingates
 Blog Ping Tool


Home & Garden blogs

Oferty i praca w Zarabiaj.pl

LosAnglesPortalen.se


