Tuesday, October 19, 2010

Laptop / Kindle / I-Pad Sleeve Tutorial

Posted by Head Fly at 12:55 PM 0 comments

In case you missed my tutorial in Delish Magazine, I wanted to share my Laptop / Kindle/ I-Pad Sleeve Tutoiral with you.  Gift giving season just around the corner and what better way to show someone you care than with a custom laptop sleeve.

This pattern can be made for any size laptop, Kindle, or I-Pad by adjusting the measurements accordingly.  I used girly fabric here, but you could definitely make this more "manly" by using a more masculine print or perhaps even some wool suiting material.

Supplies:
Cotton fabric for exterior
Fleece fabric for lining
2 buttons
Sewing machine
Seam-ripper
Thread
Iron
Ironing board
Fray Check (optional)
Fabric marking pen, chalk or pencil

Instructions:


1. Gather your supplies.


2. Determine the sizing for your laptop sleeve.  First, measure the height of your laptop.


3. Next measure the length.


4. Finally measure the width.

Once you have these measurements you can determine your pattern size.  Here is how you calculate your dimensions for the large fabric pieces (interior and exterior): (L + H + 1) X (W + H + 1).  For example, my laptop was 9 inches wide (W), 12.75 inches long (L), and 1.25 inches tall (H), so my calculation was (12.75 + 1.25 + 1) X (9 + 1.25 + 1) = 15 X 11.25.  I cut my interior and exterior fabric pieces 15" X 11.25" (4 pieces total).


5. For the straps, draw a pattern for yourself (freehand) on a piece of paper and use this as a template.  These straps are 2.5 inches wide by 7.5 inches tall (up to the very top of the curve).  Cut two from the exterior fabric and two from the fleece (lining).  Place exterior fabric right-side down on top of your lining (fleece).


6. Stitch along both long sides and the curved top, leaving the bottom open (1/4" seam allowance).


7. Here are both of your straps after stitching them together.


8. Trim the excess fabric off around the curve.  This will help it to lay nice and flat.


9. Turn both straps right-side out.


10. Press with a hot iron.


11. Here are both straps after pressing.


12. Top-stitch on both long sides and the curved top (1/8" seam allowance).  Do this in a coordinating thread.


13. Here are both straps after top-stitching.


14. Attach the button hole foot to your sewing machine.


15. Prepare to sew a button hole in each strap (according to your machines directions).  Start button hole 1/2" from the end of the strap.  Make it as big or as small as you need, depending on the buttons you have chosen to use.


16. Here is the completed button hole.


17. Now it's time to open both button holes.


18. Take your seam-ripper and open the inside of both button holes.


19. Use Fray Check on each button hole after opening.  This is entirely optional, but it really helps to prevent any additional fraying.


20. Pin both sides of your exterior fabric right-sides together.  Pin the two long sides and one short side.


21. Stitch all three sides (1/2" seam allowance)


22. Here is your exterior fabric after sewing all three sides.


23. It is important to remove the extra fabric in the two corners.


24. Clip both corners to remove any extra bulk from the fabric.


25. Turn right-side out and press.


26. Pin the straps into place.  Line up the raw edge of the strap with the raw edge of the exterior fabric.  Measure in approximately 1.5" on each side.


27. Baste straps into place.  Set machine stitch length to 3.5 and stitch along the edge (1/4" seam allowance).
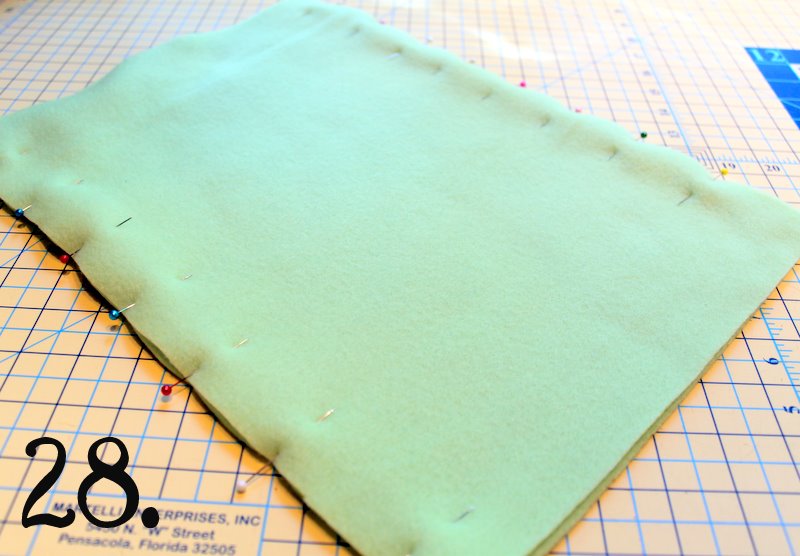

28. Pin both long sides of fleece (lining) together.


29. Stitch down both long sides (1/2" seam allowance).  Stitch part of one short-side together, but leave an opening in the middle.


30. Make sure to only stitch in about 1/3 of the way on the short side of the fleece.  The opening needs to be in the middle for you to be able to turn the laptop sleeve later.  Clip the corners to remove bulk.


31. Feed the exterior fabric in through the hole in the fleece.


32. Line up the raw edge of the exterior fabric and the raw edge of the fleece.  Pin in place, right-sides together.


33. Stitch around the top (1/2" seam allowance).


34. Here is the laptop sleeve after you have stitched around the top.


35. Now pull the exterior fabric back through the hole you left open in the fleece.


36. Turn the fleece right-side out as well.


37. Here is the hole that was left open in the bottom of the fleece lining.


38. Close the hole by slip-stitching it closed by hand.


39. This is the lining completely closed.  Tuck the lining into the exterior fabric.  Work the corners from the interior and exterior fabric into one another.


40. Top-stitch around the top opening.  Use a coordinating thread (1/2" seam allowance).


41. If you would like to sew on your personal clothing label, do so at this time.  I placed mine on the back-side in between the two straps.


42. Fold over both straps.


43. Using a fabric marking pen, chalk or pencil, mark your button placement.  Stitch by machine or hand-sew buttons into place.


Slide your laptop into the sleeve, button the straps and you will be toting your laptop in complete and ultimate style!

{ Almost Free Holiday Updates }

Posted by Head Fly at 7:49 AM 0 comments
okay, so I can't say completely free {unless you stole them},
 but these are some pretty cheap ways to jazz up you pad without leaving the house


a platter, some candles, and a plant {living or dead}
and, gives you another reason to have a glass of wine


candles ~ all fancied up and ready for their big night nestled in a wine glass, or goblet, candy dish,  or what ever is laying around the house


twigs, get outside and search for anything you can stick in a jar, bowl, container...
make the kids do it, they'll love the job!


instant grave-yard
{find some old stones and turn them sideways}
and BTW, Christmas lights aren't just for Christmas


as The Nester would say 
"shop the house girls"
let me know what you find

Monday, October 18, 2010

Sew Basics: Felting Wool

Posted by Head Fly at 8:50 AM 0 comments

Last week I happened upon the mother-load of wool sweaters at my local thrift store - only $1 per piece!  I'm always hunting for 100% wool for felting, but it's sort of hard to come by these days, so I definitely felt like I hit the jackpot last week!!  I love felted wool, but haven't done a ton with it.  So this last week, I spent the day over at my mother in-laws felting all my wool finds from the thrift store (she has a super-awesome washer and dryer).

Felting wool is very simple.  In order for the wool to felt, you need 100% wool (or close to it).  If the sweater or garment has acrylic in it, it will not felt.  Additionally, most natural animal fibers will felt well - try searching for alpaca, mohair, cashmere, just to name a few.  Check the garment label for fiber composition.

Felting is caused by heat agitation and can take a regular knitted sweater and turn it into a solid piece of wool felt - very cool!  So here's how The Cottage Mama felts wool........


Gather your wool for felting.  As you can see here, I have many different pieces - sweaters, pants, blankets, blazers, skirts, ect......you can felt just about anything as long as it is 100% wool, natural animal fibers, or a combination of the two.


Place your wool for felting into you washing machine.  You may want to put your wool inside a delicate washing bag or a zippered pillowcase as it does tend to produce a lot of lint.  It's up to you.


I set my mother-in-laws washing machine on "sanitary" because that is the highest temperature and longest agitation.  Set your washing machine to the highest temp. setting - extra hot/cold or hot/cold for the longest length of time.  I do not add soap.

After the wool has cycled through the washing machine, place it in the dryer and dry the wool on the hottest setting possible.  Generally this is the cotton setting.

Once dry, remove from the dryer and see if the felting is to your liking.  Felting has occurred if your garments have shrunk a considerable amount and the stitching is less noticeable.  On some garments you will not be able to see the stitching at all and on others it will just be less noticeable.  Some items will felt better than others.  You can always run your wool through another washing and drying cycle if you aren't satisfied with the felting on the first try.


The sweater above is one that felted really well.  This started out as an x-large woman's sweater, but once felted, you can no longer see the individual knitting stitches and it would not even fit my 2-year old.  Felted sweaters tend to get thicker and a bit more stiff after felting as well.

Once wool is felted, it becomes an entirely different piece of material to work with.  I almost equate it to working with fleece (but much cooler).  As you probably know, fleece will not fray on the raw edges so you don't really need to hem garments or worry about finish edges.  Wool felt is the same way - once felted, the fibers are bonded together and will rarely fray.

This weekend we had some fall fun at the pumpkin patch and I made my daughter, Savannah Rose, a felted wool sweater coat to keep her toasty in the cool autumn air.  This sweater coat was made entirely from thrift store items - total coat $4.00!  Here is the design I came up with.....


For this sweater coat, I used three different wool sweaters and one piece of felted wool suiting.  I left the bottom edge of the coat and the sleeves unfinished.


The back panel was the piece of felted wool suiting.  I cut leaves out of the other three sweaters and stitched them onto the back.  I used a straight stitch around each leave.  I also cut two elbow patches and stitched them with a straight-stitch as well.


For the front button closure, I simply cut a slit into the wool flap - no button hole!  I added some basic embroidery stitching and finished it off with a little mushroom button.


I cut a peter-pan collar from the wool suiting and left all of the edges raw.


I added some simple embroidery stitches onto some of the sweater leaves as well.


I love the earthiness of this coat - perfect for fall!


It was a gorgeous fall weekend. This is definitely my favorite time of year in the Midwest.


Sometimes it just feels so good to scoop up those fall leaves and throw them all over your head!


I think Miss Savannah likes the little fall coat her mama made for her!

Happy Felting!

Cottage Mama's Note:  Stay tuned for a felted wool project tutorial coming later this week!

giveaway

Posted by Head Fly at 4:00 AM 0 comments

being “green” has become more and more popular in the last few years, and nowhere is it more prevalent than in interior design.  as a designer i am constantly looking for sources that offer sustainable products.  i also try to repurpose as many items as possible in my when designing my clients’ homes and my own. 

Historic Renovation

{lori dennis interior design}

lori dennis is one of the nations leading “green” interior designers.  she has specialized in green interior design practices for over 10 years, and her firm was also recently named the nation’s best green and modern design by asid, southern accents, california homes, angeleno and home magazine.  lori has just recently written a book all about sustainability and green interior design.  i was so excited when she contacted me and wanted to offer a copy of her new book green interior design to one of my readers!

Cover High Res.

for lori being green is not just a trend it’s a way of life.  from a young age lori has been conscious of recycling, repurposing and reusing.  she decided to combine her green lifestyle with her design practices and is now sharing some of her best kept resources for sustainable design in her book.

Historic Renovation

{lori dennis interior design}

green interior design, is a great source for any designer looking to offer green interior design to their clients.  in her book lori gives so many helpful hints and ideas for green design.  her topics range from window treatments to nurseries to landscaping. Carmel Valley Country

{lori dennis interior design}

not only does the book contain a wealth of knowledge about sustainable design, but there are also some amazing photos from dennis’ portfolio.  i’ve provided a sampling in this post and you can check out more of her design portfolio here.

Hollywood Hills

{lori dennis interior design}

now, for the details about the giveaway… 

to enter to win a copy of lori’s book green interior design leave a comment on this post.  in your comment let me know the last “green” thing you did was.  {for example, you could say you recycled your newspapers this morning or you could say that you drove your hybrid car to work.}  to get an extra entry you can also tweet about the giveaway.  ***make sure that when you leave a comment you either link back to your blog or leave your email address so that i will be able to get in touch with you if you win.

the deadline for the giveaway will be friday night, october 22nd, at midnight.  i’ll announce the winner on the blog the following monday. 

best of luck and remember to be green!

Sunday, October 17, 2010

{ The Table }

Posted by Head Fly at 6:19 AM 0 comments
really...do I need to say anything?


I love barn wood tables.
This table was made by John Duffy of 
{as in horse stables ~ or is it because they are so sturdy?}
who knows, it's top secret
Either way they are way gorgie
John has tons of options.
He can create almost any size table you want, with way cool legs.
Not just your average shaker, turned, or straight leg.
Oh no, John's got goodies like these...
iron legs

and crossed legs 
{I'm sure this isn't the official name for these legs}


and my personal fav...
the old porch with chippy paint column leg


here's the wood before it grew into a table


freshly cut...
{that's John in his flashdance phase}


and John makes more than just tables ya' know
side tables


vanities...hello!


cabinets, or whatever this is


benches


There's a lot more on John's website.
And, you can see how pleased all John's customer's are on his Facebook page.

I'm hoping to be one of those customers REAL soon.
Stay tuned for that post, I may have fireworks too!


Saturday, October 16, 2010

{ F a v i c o n }

Posted by Head Fly at 7:40 AM 0 comments
honestly, I had now idea what a "favicon" was until recently.
Apparently it's the little symbol next to your blog address's name.
like right now, there's an orange stylized "B", for blogger.  
okay, we all get it now? right?
Soon The Painted Home will have a jazzed up, personalized favicon.
Thrilling for you, I know.


changes are in the works...
look for some fun add-ons, 
like...
  • an updated portfolio 
  • fancy schmantz new look
  • design consultations
  • and - drum roll please, the favicon!
{really, it just and excuse to say the word favicon}

Friday, October 15, 2010

{ D i n e & D e s i g n }

Posted by Head Fly at 7:19 AM 0 comments
Thank you to all our old friends and new ~


you made our open house a huge success last night.
{thanks to Matt Sabia of NRDW for set up & design of the exterior decor}


All your compliments and support are greatly appreciated.
{ thank you Jeanne Jones for the unbelievably delicious goodies, yummo}


We hope you enjoyed yourself and met some new friends too.
{stables tables provided this re-claimed wood table that had everyone ewwing and ahhing ~ thanks John Duffy }


It's always nice to share a glass of wine with you ladies.
We'll see you again soon!
~ Cheers ~


Related Posts Plugin for WordPress, Blogger...
 

home appliances Template by Ipietoon Blogger Template | Gadget Review