Wednesday, January 4, 2012

{ The Hot Chocolate Station }

Posted by Head Fly at 4:11 PM 0 comments
I made a hot chocolate station last winter and the kids loved it.
Here's this year's version.
It's one of the simplest ways to "wow" your kids with little to no effort.


Client Progress...Seasons of Change

Posted by Head Fly at 5:00 AM 0 comments
 How you remember time is an interesting thing. With building clients my memories of the job are often tied directly to the weather since building from the ground up progresses through many seasons.   Last winter I sat across from a new client at a local Starbucks (pre office days) and we discussed her future home that was being drawn up.  It was cold and dreary outside but the images of a place the family could nest for years to come kept us warm.  I also clearly remember telling her I was pregnant, "but not to worry, we will work around it".
  Quickly the winter turned into spring and as the days got longer we used the extra daylight to study and debate decisions like type of brick and various counter tops and tile options.
And then came the HEAT and the bump was in full force.  Oh those many July and August days on the various job sites, they were something else....

The months continued to fly by and here we find ourselves again; winter bringing the cold weather back, only this time the house is no longer a dream.  I stopped by on Monday to see the progress and it was a great way to start the new year.  Months of dreaming and planning coming to fruition....and good looking fruition at that.


 Can you see the memories that will be made in this kitchen?  I can.  The best thing about being an Interior Decorator is not the creative outlet (although that is a huge perk), it is working with people to make a house their home. Large job or small, it always feels just as good.
Sneak peek: A slate backsplash and gorgeous counter tops (hard to see in this picture) = a good time in the upstairs entertaining/guest area.
 Oh those countertops I am so obsessed with.....
And as much fun as this day was, I know even better days are ahead in the coming weeks...move in day!  Beauties like these will be unwrapped and placed in their permanent home.  Of course everything takes time and I know when the warm winds of Spring arrive we will think back to this cold day and how far everything has come, all the while knowing more seasons will come and go before we are ever "finished".  And that is okay.

Sponsored Fabric Giveaway: Canton Village Quilt Works

Posted by Head Fly at 4:28 AM 0 comments

We've got another great new sponsor that's recently been added to The Cottage Home blog family!


I'm pleased and excited to announce the addition of Canton Village Quilt Works!

Canton Village Quilt Works has a ton to offer in the world of quilting.  Not only do they carry a fabulous array of quilting cotton fabrics, they also offer precuts, notions, as well as long arm quilting services.

Jackie, owner of Canton Village Quilt Works, first started quilting in 1992 and her love of this art has grown tremendously.  In 2000, Jackie opening her own long arm quilting business, Canton Village Quilt Works, and continues this business in her home.  She is an award winning quilter and belongs to the International Machine Quilter's Association (IMQA) as well as being a member of the Farmington Valley Quilt Guild since 1997.  She is also a member of the American Quilter's Society as well as a contributor to Quilting Magazine and is a quilting podcaster.

Today, Jackie is giving away a hand-selected bundle of fabrics to one lucky The Cottage Home Blog reader.


The bundle, pictured above, consists of 8 fat quarters from Art Gallery Premium Designer fabrics Lace and Oval Elements Collections.  If you've never felt Art Gallery fabric, you are in for a real treat.  The hand of their fabric is divine and it washes beautifully.  I can think of many prints that would pair really nicely with these fabrics.  

There are several ways to enter the Canton Village Quilt Works fabric giveaway.  You can do one or all of the following:
1) Visit Canton Village Quilt Works and tell us what your favorite products are in their shop (click here).
2) Sign up for Canton Village Quilt Works newsletter (click here).
3) 'Like' Canton Village Quilt Works on Facebook (click here).
4) Follow the Canton Village Quilt Works blog (click here).

Giveaway will be open until Monday ~ January 9th, 2012 at midnight (CST).

Jackie is also offering an exclusive discount of 15% off everything in her shop for the duration of this giveaway with the code: COTTAGE15 

Even if you aren't entering this particular giveaway, I'd love for you to show our sponsor some love and pop over to visit their shop.  Jackie is a truly talented quilter and has a lot to offer through her shop, Canton Village Quilt Works. To listen to Jackie's quilting podcasts, click here and on i-tunes, click here. And to view her YouTube videos, click here.

Welcome to the family, Canton Village Quilt Works!

If you are interested in becoming a sponsor of The Cottage Home blog, please email Lindsay at thecottagemama@gmail.com for rates and additional information.

feeling young in France

Posted by Head Fly at 12:56 AM 0 comments


When my husband popped to the village shop to buy croissants early on New Year's day, he bumped into our neighbour, Henri.

They shook hands and wished each other all the best for the year to come, and talked about this and that.  As they parted dear Henri  smiled and said  that  he'd be having a quiet day.  "Oh?" asked my husband, "not under the weather are you?",  "Non, non, pas du tout", replied Henri, " but I was dancing until 4.30 am, my feet are a little sore"  ...........  Henri is 94 years old!

What is Henri's secret? 

There is no doubt that the simple French life, eating good food and enjoying life seems to pay off.    he has worked hard all his life, I'm told he was a "force de la nature" (extremely strong) when young.   He still tends his (huge) garden, grows all his own vegetables, chops his wood, plays cards with friends most afternoons and yes, he loves to dance.

He once told me that he wears trainers to dance in these days because it gives him more spring to his step... and I have heard that he glides around that dance floor.   His wife likes to dance too, but I think she's finding it hard to keep up.
Henri has girlfriends come and ring at his gate on Sunday afternoons, asking if he's free to go dancing at the village Guingette (dancing tea salon),  mostly he says yes, but now and  again his wife says that he has to finish his chores first!


All through the month of January Henri and his wife will be sharing the Galette des Rois with their family and friends, Sunday afternoon is a favourite moment of the week for cutting into this delicious almond pastry, seeing who gets to be 'king'  and wishing each other Bonne Année over a glass of champagne.

One Sunday afternoon as my girls were riding through the village, they noticed that there were gendarmes stopping cars and inviting drivers to blow into a balloon!   Further down the road they met an elderly lady we know, she slowed down the car to chat and the girls told her about the gendarmes.  "Oh merci mes chéries, I just enjoyed a galette and champagne with some girlfriends, I think I'll take another route home"!!  With that she turned the car around and shot off in the other direction! ...   That sweet lady is also over 90.


We are lucky to know these delicious people, among the last of a generation who has seen the village change and grow.  We'd all do well to follow their example!


Tuesday, January 3, 2012

art in living room

Posted by Head Fly at 12:47 PM 0 comments

I finally found some inspiration for what to fill my frames with in my living room. Funny enough, the art was sitting in my basement this whole time. When Jen asked me for my favourite post of 2011, I picked my Flamingo project. Although I loved the project, and the print, the yellow frame I found hard to integrate into my house. So I moved him to the living room. Kind of cheeky, informal, and I love. I'm now trying to find a complimentary print for the other frame

{ Globe Pendants }

Posted by Head Fly at 11:21 AM 0 comments

I decided to make a pendant light out of a vintage globe I found at a flea market.
It may have been one of the quickest and easiest project I have ever done. 
So, get yourself a globe and start drillin'!


I separated the globe with a straight edge knife right along the seem. It popped right apart.


I used a circular drill bit the same diameter as the light I was going to use.


Drilled a whole through the top.


Popped the light fixture through the whole...(which I purchased at IKEA)


Tada, more later when I hang them.

Operation Organization: Velcro Toy Storage Labels

Posted by Head Fly at 4:36 AM 0 comments

This year is going to be about some serious organization here at The Cottage Home.  With having three children under the age of 4, I sometimes feel like certain spaces in my home are spiraling out of control.  Well, no more!  I'm taking action and going to try my best to gain some control over the clutter that seems to come with having small children.

Now, I know there will be messes and chaos from time to time, but I'm going to try to implement some systems for our family to make life a little more orderly.  And hopefully help me keep my sanity.  I don't know about you, but when things in my home and life are in order I can accomplish SO much more.

"A Place for Everything and Everything in it's Place"

One of my friends over on The Cottage Mama Facebook page chimed in with this quote recently when I was asking about tips for kids toy organization and I just love it.  To some this might sound somewhat sickening, but I like it and plan to keep in in the forefront of my mind this year.

My girls toys have been out of control lately.  There are so many pieces to so many different toys and they just kept getting all jumbled up.  I spent four hours one day just reorganizing the kids toys, only to have them turned into a jumbled mess two days later.  I thought, "oh my gosh, what a waste of time!"  But then I realized that I can't expect my kids to know where things go without me showing them.  This was definitely a 'duh' moment.  I am a big fan of my label maker, but it doesn't do much good for those that can't read my labels.


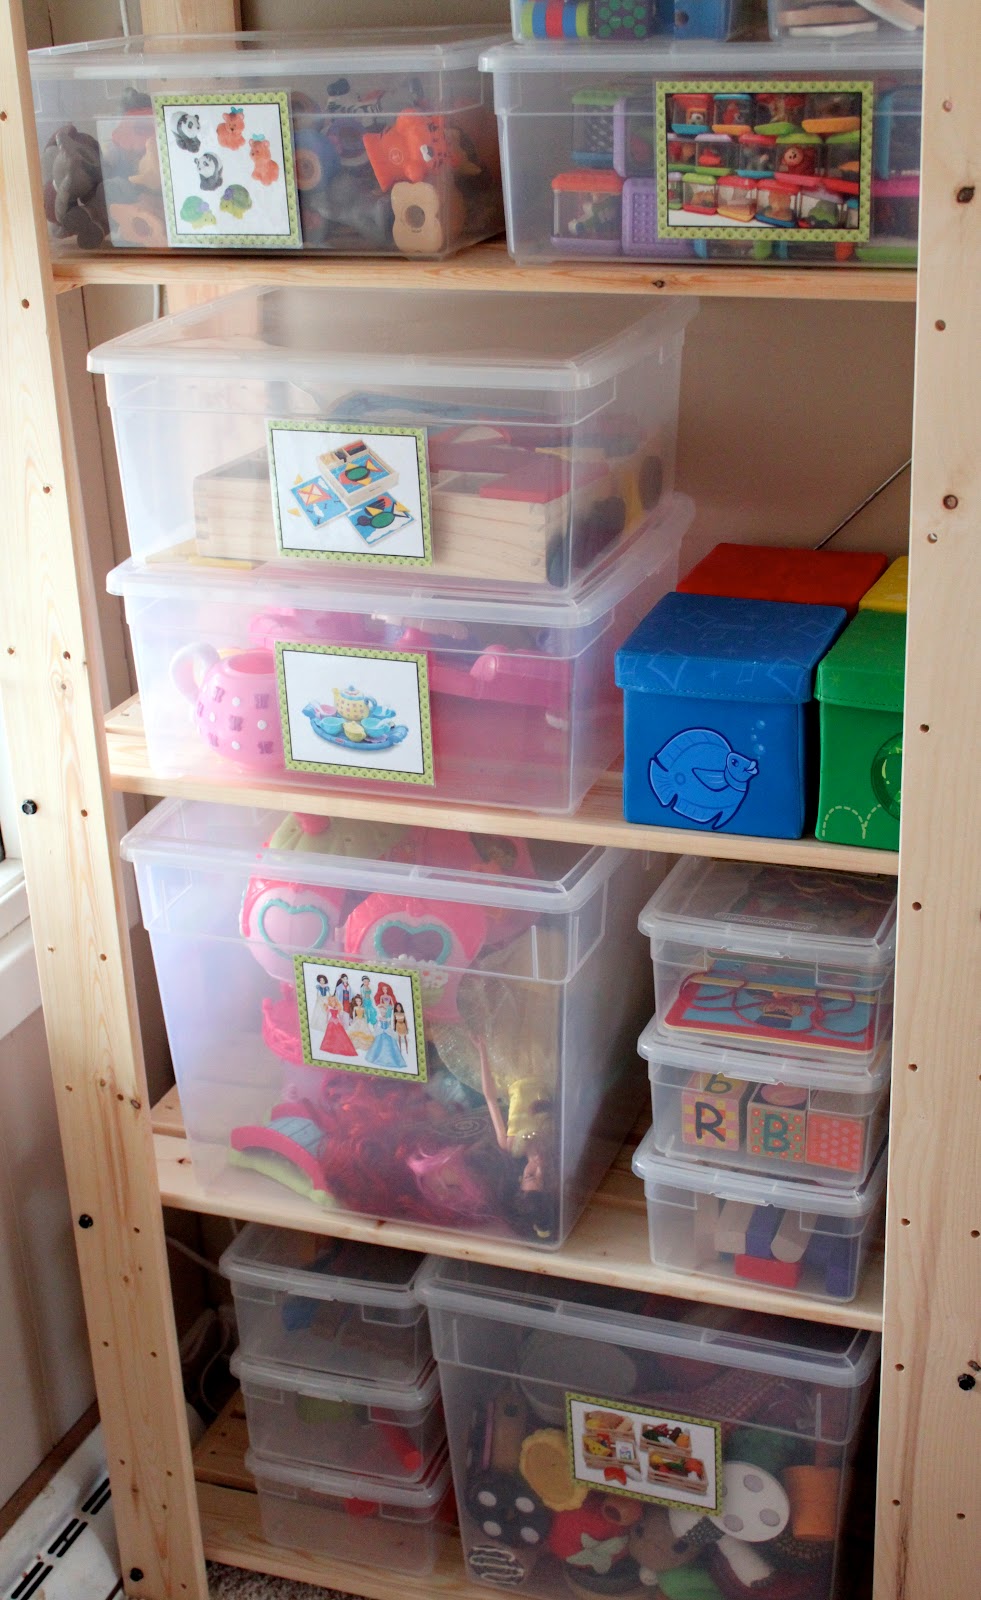
This lead me to try a new tactic for our toy organization ~ Velcro Toy Picture Storage Labels.  Why didn't I think of this sooner?  IKEA was having a great sale on these bookcases, only $9.99 each!  So I bought several.  One for the play room and three others for the 'Cottage Mama' storage loft conversion that is taking place in our house as well (more on that at a later time).  Then my in-laws gave me a gift certificate to The Container Store for Christmas, so I bought a bunch of clear storage containers to get this project underway.

Want to make your own Toy Storage Labels?  Here's the 'how to'........

Operation Organization: Velcro Toy Storage Labels

Supplies:
A computer and printer
Cardstock or thick scrapbook paper
Laminating Sheets
Sticky Velcro
Scissors
Paper cutter (optional)

Instructions:


Take inventory of the toys you would like to contain.  I pretty much used containers for the toys with lots of pieces.  The larger items are still being stored in our woven cube storage system.  Once you know what toys you need to store, google the name of the exact toy and save a picture of it on your computer.  Print out the pictures at a reasonable size to fit on your containers.


Cut out the pictures of all the different toys.  There were only one or two toys where I couldn't find the exact picture, but try to make sure you come as close as possible to the correct toy ~ this will make it much easier for your little one to clean up.  I also added a black border around each picture, just because I liked the way it looked.


I matted each picture onto a thick scrapbook paper or cardstock to add some durability and body to the labels.  I put a little piece of scotch tape on the back of the picture (just to hold it in place) and then cut a mat out with my paper cutter.  You could also use a ruler and scissors as well.


Once your pictures are matted, you will want to laminate them to keep them looking nice.  You can buy self-laminating sheets at your local office supply store.  I don't think a lot of people know you can laminate things at home without a fancy machine, but you can!  It's really easy and they look really nice.


The laminating sheets are generally the size of a regular sheet of paper, so you will need to cut out each label after laminating.


Next we are going to add velcro to the back of each label.  Why, you might ask?  Because this way if we ever want to store something different in the box, we can simply replace the label without damaging the box.  Also, if you decided to re-organize or add to that certain, specific toy, you can change it to another box and still use the label.


Cut a piece of sticky back velcro and stick to the back of each label.  The card stock I used happened to be double-sided, so that's why there is a different print on the back.


After you've secured your velcro to the label, you will peel off the other side and stick it to your container.  There are some boxes where I secured it to the lid (as the box was too small to place it on the container portion), but for the larger boxes I place it on the actual container.


Once you've got the velcro applied to all your containers, begin to organize and sort all the toys.  You can have your little ones help you with this.  My girls love to help organize (now if I can just teach them to stay organized) and they get a little more excited about the new organization in the playroom if they feel they were part of the project.


Once you've got all your toys contained, place them on the shelves.  I decided to place the toys that the girls have free range to access without me on the lower shelves and the ones where I want them to ask me before using up higher.  I think this is also a great method for when you have a little baby around.  You might not want your older children to have certain toys out when baby is around because of choking hazards, so this will give you some control over that.  That way the older children can play with the 'big kid' toys when baby is not around or napping.

We are also really, really going to try to make sure the girls clean up one toy before getting out another.  I don't mind all the dress up and pretend play things being out because I want to foster and encourage that kind of play at all times, but for the toys with lots of pieces, I think a good clean up is definitely necessary before moving onto to the next toy.

Also, I think if you are a really visual person (as I am), making some picture labels would be good in an adult space too.  I can see these being really helpful in my studio, so that I don't have to read a bunch of labels that all look the same, I can simply have the picture jump right out at me.

I originally wanted to paint my super great deal IKEA bookcase black, but my husband said he liked the raw wood.  So we're going to live with it for awhile and see, but I still may paint it.......

I know I can't have everything in my life be organized, but I think we all strive to have some type of order in the everyday.  I feel much better knowing that we are off to a great start on the road to organization for 2012!

Be on the look-out for more 'Operation Organization' posts to come this year.  

What aspect of your life are you trying to organize this year?
Anyone else's kids toys taking over their space?
Related Posts Plugin for WordPress, Blogger...
 

home appliances Template by Ipietoon Blogger Template | Gadget Review