
Part 5: Binding
34. Binding--Stitching all complete? It is time to bind your quilt. Yea! We are almost finished! I like to machine stitch the binding on to the quilt and then finish it up with hand stitching.
35. Place the ends of two binding pieces right sides together as shown. Use a fabric marker to draw a line diagonally across the pieces, pin and stitch along the drawn line. Trim to ¼ inch and press. Attach a third piece in the same way. Continue joining all the pieces together—making one long piece of binding.


36. Fold the binding WRONG sides together and press along the length of the binding.

37. Leaving a 9-10 inch piece free, place the open edges of the folded binding along the edge of the quilt top—I usually start on the bottom edge of the quilt as the finish will be somewhat less obvious. Some quilters trim up the excess batting and quilt backing that extends past the quilt top right now but I really prefer to wait to do this later so that I am not battling to make sure I catch all the edges of the quilt sandwich in my stitching.

38. Using your walking foot, stitch the binding on the quilt using a ¼ seam. I do not pin this step—just place the binding along the edge as I go –sometimes adjusting a little to keep it smooth and without puckers.

39. To make a nice, neat mitered corner, stitch to ¼ inch away from the first corner. Lift your presser foot, rotate the quilt up slightly, put presser foot down and then take just a couple of stitches angled out to the corner edge. Clip your top and bottom threads.


40. Turn the quilt, fold the binding up and then down as shown, and start stitching again along the edge of the second side of the quilt. Repeat for the next three corners and sides.


41. Stop stitching at least 10 inches from where you began attaching the binding.
42. Sewing the two ends of the binding together is my very least favorite part of this because for some reason I always struggle to get it to fit evenly. I came across this neat little tool, cut Rite Bind Up, on-line and ordered one from www.quiltersparadiseesc.com I have used it several times and it is definitely helping me do a better job. It comes with great directions and pictures.
43. Press the two ends of the unsewn binding so they meet and match up.

44. Unfold the left side of the binding so the wrong side is up and using a fabric pen mark the creased edges as shown on the wrong side of the fabric. Lay the tool on top of the wrong side of the fabric as shown, matching the markings on the tool with the fabric pen lines on the fabric and cut along the angled edge. Repeat for the right side of the binding piece.


45. Sew the two ends of the binding together, right sides together in a ¼ inch seam. Check for a good fit and finish stitching the binding to the quilt. Whew, done!

46. Now trim the edges of the quilt on all four sides. Cut off the excess batting and quilt back fabric, at least ¼ inch away from stitches. Cut carefully—I position on the quilt on the ironing board so I can pull the fabric somewhat taut with my left hand as I trim with my right.

47. Now my favorite part—hand stitching the binding to the quilt back!! I know some quilters really do not like this and prefer to machine stitch the binding but for some reason I find this very relaxing to have a little hand work to do. I machine sew upstairs in my sewing room away from where my dear hubby, Pepo, usually hangs out in the downstairs den with the big TV. This is a great project to work on as I sit next to him and watch TV with him or make him carry on a “meaningful’ conversation with me. (He is rolling his eyes about now…he is not a big talker.) Anyway, I love the feeling of getting close to finishing a project and seeing what the quilt is actually going to look like. I really like to think about the person that I am making the quilt for as finish this last step.
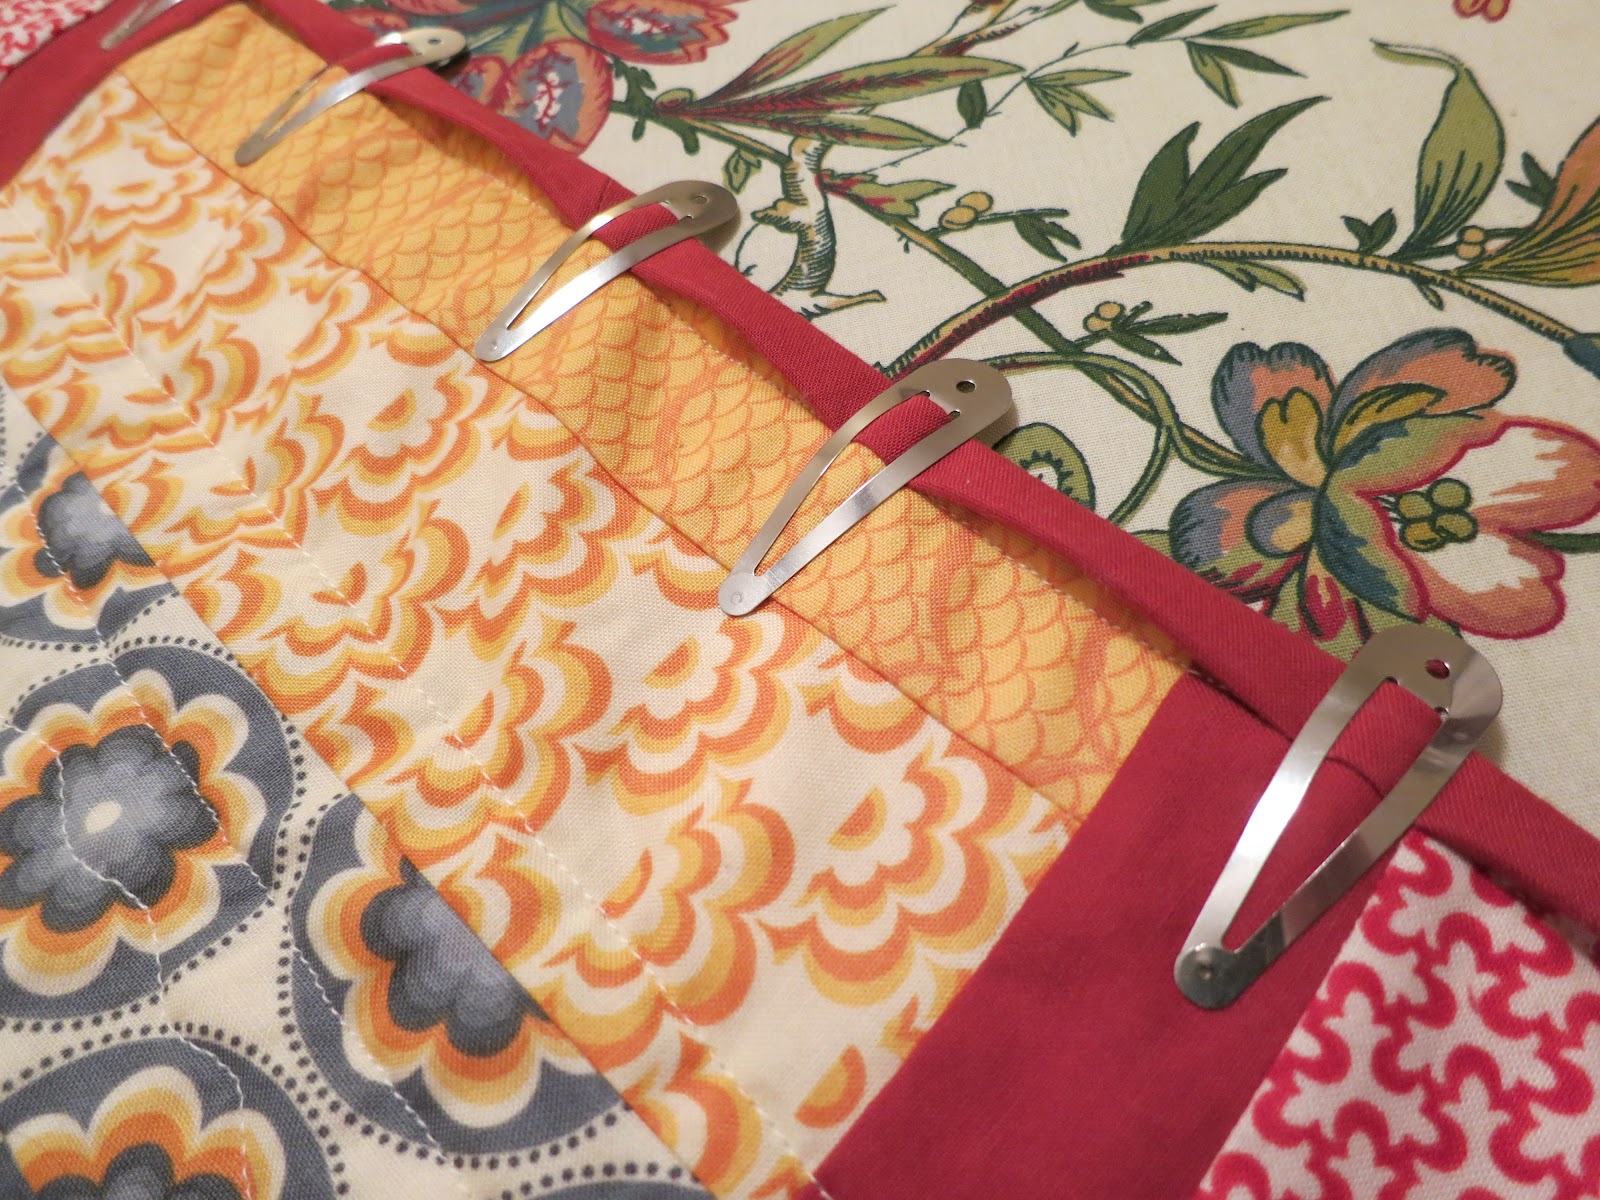
48. Fold the creased edge of binding up over the edge of the quilt to the quilt back. I love these quilt binding clips—so easy and much better than pinning.
49. I start sewing the binding down on the bottom of the quilt and work right to left with my stitches. Using a single strand of thread, make a knot and pull needle through on the underside of the binding, catching slightly the batting and quilt back fabric and exiting right in the crease of the binding.

50. Take a small stitch out from the binding crease into the line of stitches you made when machine stitching the binding. Insert the needle through the quilt back fabric and batting, taking care not to catch the quilt top, and make a stitch towards the left about ¼ inch in length. Pull the needle up through the crease of the binding and repeat moving along right to left.

51. When you approach the corner, hold the binding down and take several stitches up into the corner. Fold the binding over from the next side—making a nice mitered edge and take a couple of small stitches in the angled fold. Continue stitching, taking care to keep your stitches along the creased edge as small as possible so they do not show.


52. Whew! It’s finished and is ready to toss in the washer on COLD gentle cycle. An absolute must in my book is to use a Shout Color Catcher. These little sheets are miracle workers in “catching” any color that may bleed from your fabric—especially when working with white and any dark colors like red, orange or blue. I have been known when really nervous about bleeding colors to throw in 3 or 4 of the little sheets and I have not had a problem yet.
53. Take your quilt out of the washer as soon as the washer stops so wet fabric does not get any other chance to bleed. Toss in the dryer to get it all warm and cozy. It is fun to see how it crinkles up along the quilting lines. I think I like the look of my circle quilt on the sofa in my sewing room. Piecing the back gives a nice surprise when you flip it over too. I didn’t get a label on this quilt yet and maybe we can talk about that on another day.


This has been such fun talking and sharing on Lindsay’s blog. I hope I have been able to share a little something that you didn’t already know. Most of all I wanted to share how much I love the idea of a cozy, warm gift of a quilt to be used to “cover in love and hugs” a special person. It’s a way to give a hug from miles away and who isn’t going to treasure that for many year to come? Like I said, I think I am keeping this circle quilt for me as a reminder of all those crazy, wonderful circles in my life!
P. S. My next adventure is going to be competing as one of 100 finalists in the 45th Pillsbury Bake-off Contest in Orlando, Florida on March 26th. Martha Stewart is hosting and will be announcing the Million Dollar winner live on her show on March 27th on the Hallmark Channel 11 am EST. Pepo, Lindsay and Baby Caspian will be there with me so keep a look out for us!
In case you missed the earlier parts of the quilt tutorial you can view:
A BIG giant thank you to my mom for putting together this wonderful series! A lot of work goes into taking step-by-step pictures and coming up with clear instructions that everyone can understand. So again, Mom, THANK YOU ~ You are the best!
Wish Mom luck at the Pillsbury Bake-Off Contest this weekend! Caspian will be sporting his Pillsbury doughboy hat that I made for him, so we should be pretty easy to spot during the competition. Although, I'm not sure Martha Stewart would appreciate him wearing his hat to her show, so we may leave that it the hotel room during the taping of her show. But anyway, just look for the brown haired mama with a super-chubby, completely adorable, bald baby boy! Can't wait!!


0 comments:
Post a Comment