
Grandma Jane is sharing a free quilt pattern and tutorial for everyone. Today she will share the first part and will post every day this week until we have sewn the quilt from start to finish. Sound like fun? If you've ever been interested in quilting, make sure you follow along (or sew along, for that matter).
And now, without further ado, here is The Cottage Mama's Mama, Grandma Jane:

Will it go round in circles?
How much fun it this? Here I am on my daughter, Lindsay’s, blog and have been invited to do a tutorial! Pretty amazing since a couple of years ago I had no idea what a blog was until Lindsay explained her plan for The Cottage Home. Wow! I have been so impressed with the sharing of creativity and the learning opportunities out there on blogs with all the sewing, crafting, cooking and project ideas. I must admit I spend a little too much time looking at all the great ideas/inspiration on blogs—don’t even get me started on my new love of Pinterest!
I started sewing way back in 8th grade home economics class in Colby, Kansas, with inspiration and lots of help from my sister, Sarah, who was into sewing her own clothes. (Do schools even offer home economics and sewing anymore?) Our mother didn’t sew… her creativity and artistic talents shined in many other respects (that’s a whole story in itself) but we didn’t expect her to do anything more complicated than sewing on a button.
Through the years I sewed clothes for myself and clothes, toys, costumes for my children—oh, yes, the costumes…Did you know The Cottage Mama was a musical theater major her first year of college? That path included many, many (did I say many?) costumes for the stage sewn by this “stage mama” through the years. Lindsay changed directions to a degree in finance…. but let me tell you this girl has the voice of an angel that makes me tear up and get a giant lump in my throat every time I hear her sing.
Lindsay has been an incredible inspiration for me to get the creative juices flowing and she encouraged me to get sewing again last year with a Christmas gift of several Kate Spain Fandango charm packs and an Amy Butler book. My dear friend, Diane had also invited me to join her church quilt ministry group. Margaret, the leader of the ministry and also the “Head Quilting Nerd,” as she refers to herself, got me hooked the first night of class as she talked about the beauty of the longevity of the gift of a quilt. The thought of creating a gift that could be handed down through the generations was incredibly appealing to me. So please understand I am a newbie at this quilting thing but am glad to share some ideas with you.

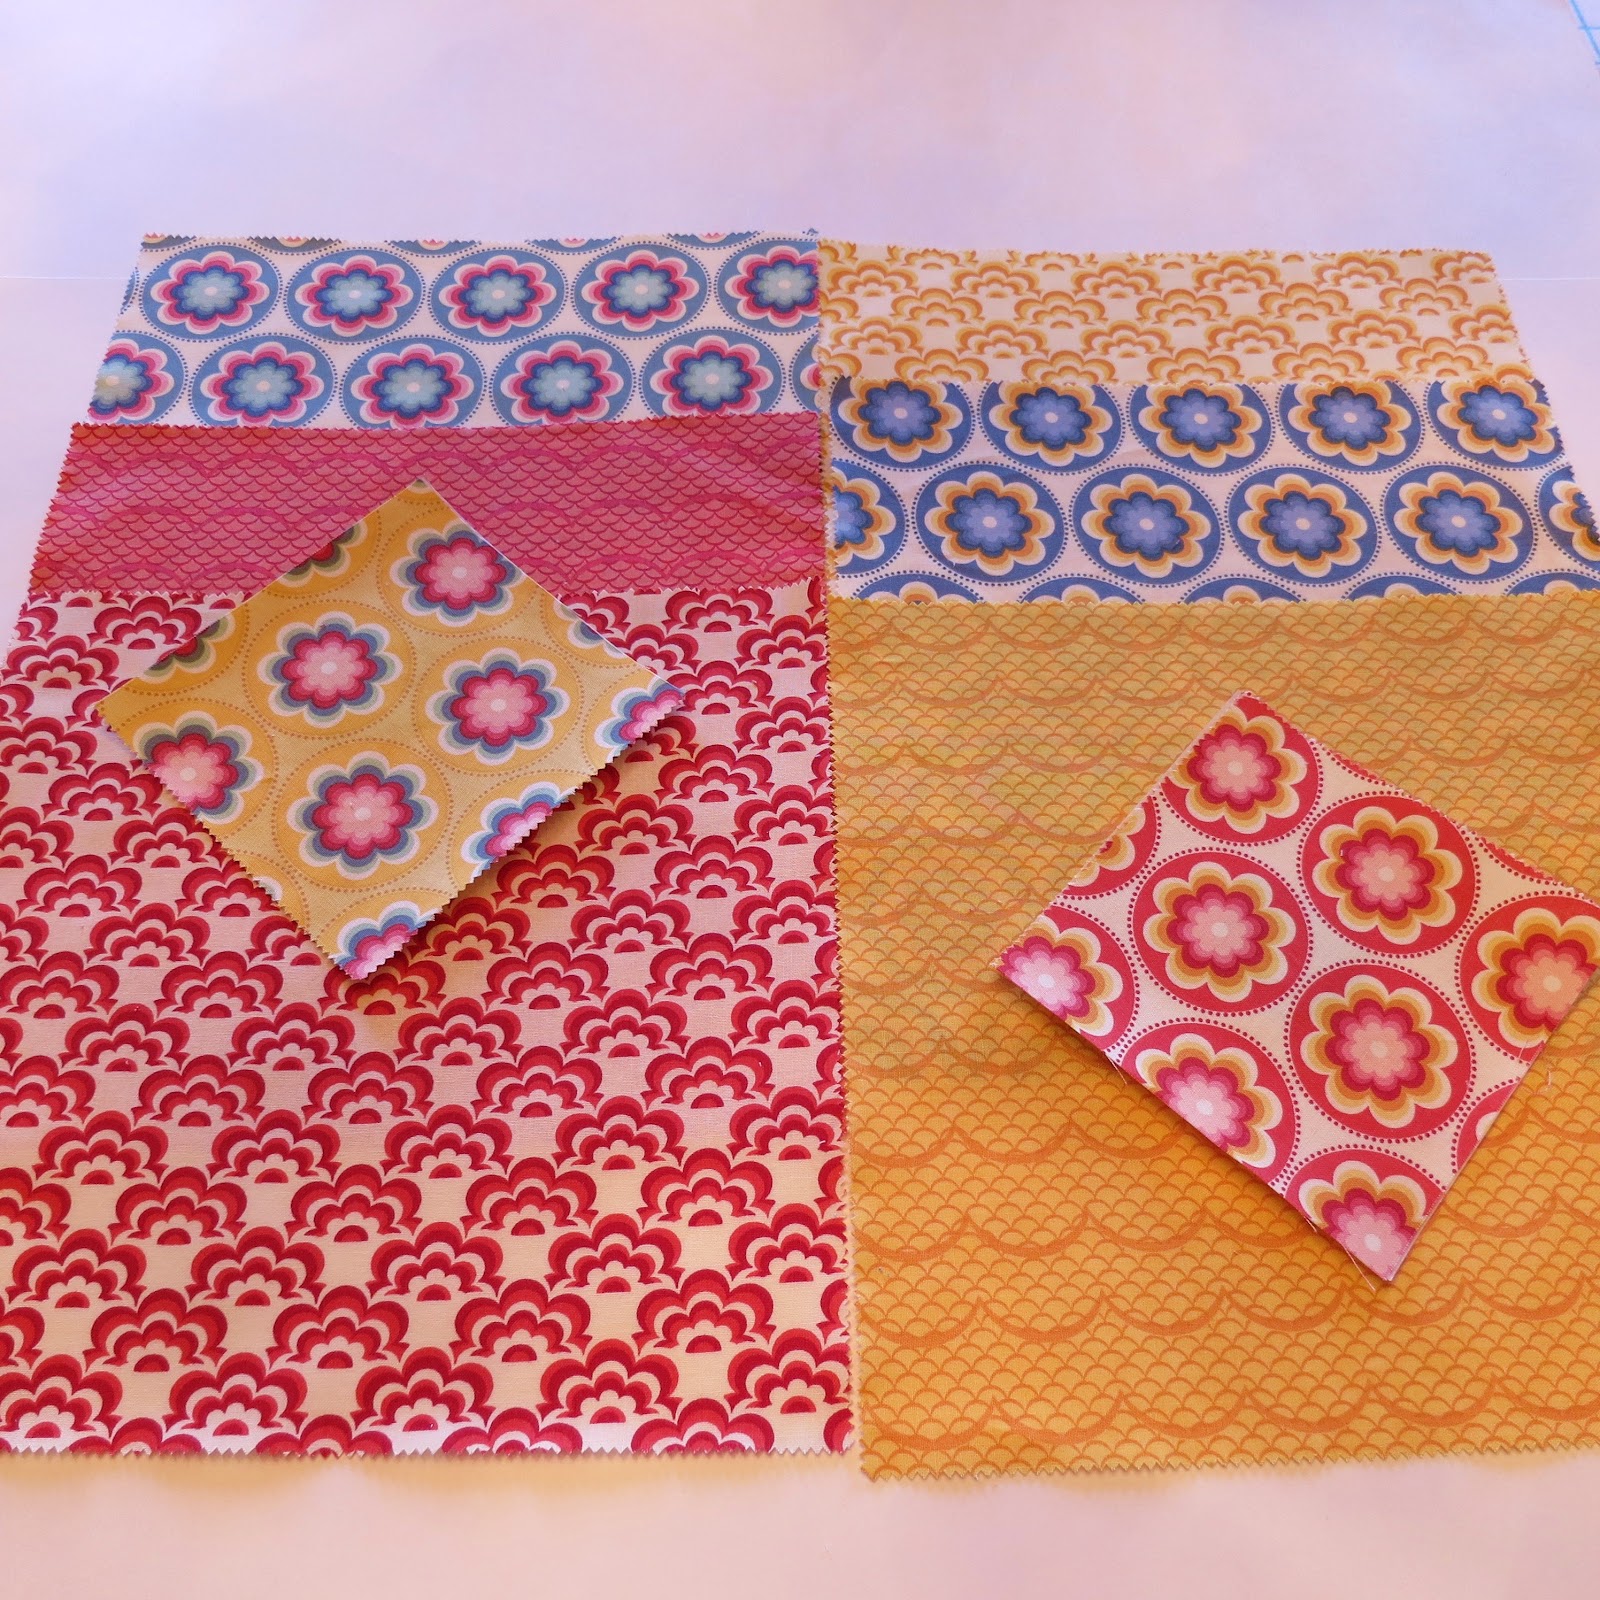
Quilt Front
I have really been drawn to circles in quilt designs lately and when I saw the new Salt Air by Cosmo Cricket for Moda Fabrics, I thought it was perfect. I also was looking for a reason to use my new AccuQuilt Go Baby that I gave myself for Christmas. (Do you ever do that?)
Funny thing happened when I started working on my quilt. That 1970’s Billy Preston song, Will It Go Round in Circles, kept popping into my head. A blast from my high school past for sure. I know that sounds funny—why not the beautiful Circle of Life song from The Lion King? (That would be much more “grandma-like.”) Nope! Billy’s rock and roll song kept going through my head over and over and over again.
The more I thought about that song, I started thinking about how life is so very full of circles! (This is about where my kids kind of roll their eyes and say—“you are so corny, Mom.”) I admit it--I am a pretty sentimental type…I just can’t help it.

Quilt Backing
But really…think about it—we have that expected cycle and “circle of life”--we grow, create our own lives and families, and we eventually come around 360 degrees and watch our children grow and start their families. We find ourselves in the places our parents and grandparents were. That circle comes “round” lots sooner than we ever thought it would.
Then we have those crazy happy, wonderful, twirly circles-you know the kind of circles that give you that dizzy, excited feeling you got as a kid when you twirled and twirled and spun with arms spread wide with pure true joy…falling in love, getting married, holding our children and grandbabies….pure joy!
Busy, busy madly running circles—the mode we get in when we are raising our families, working, and just trying to keep up! Exhausting, tiring…sometimes feeling like a hamster running round in a little wheel.
Knock you off your feet spinning circles …the kind that hit you hard and spin you around sometimes when you are least expecting it….an illness, a death, divorce, problems with our kids, losing a job… heartaches…difficult to get up and go on sometimes…but we do.
Circles of support… family, friends, co-workers, church…true blessings and gifts….they may change through the years but always present and precious.
So….will it go “round” in circles? Yes, it will….all sorts of circles …all sorts of directions…at all sorts of speeds. Here is my simple circle quilt that reminded me of this…. Think I am keeping this one for me.


I followed this basic pattern over at the Moda Bake Shop (tons of ideas and free patterns) but changed it up a little to make a larger size lap quilt and am going to give you some of my very basic sewing tips. I usually “tweak” things as I go along any way and rarely keep entirely to a pattern.

Supplies / Cutting Instructions for generous lap size quilt 56 inches x 64 inches:
Background: 3 yds neutral color fabric (Moda Bella Solids Cream)
• Cut (12) 7 ½ inch x WOF (width of fabric) strips
• Trim off selvages. Crosscut in 7 ½ inch squares. Each strip will yield (4) cut squares and one piece on the fold that you will open, press and cut into another 7 ½ x 7 ½ square. (Total 5 squares per strip)
Circles: (56) 5” charm squares, scraps, or approximately 1 ¼ yd to cut your own squares. (Moda Salt Air by Cosmo Cricket).
• If cutting your own--Cut (7) 5 inch strips x WOF, trim off selvages and crosscut into 5 inch squares. Each strip will yield 8 cut squares.
Fusible web backing: Enough to cover all (56) 5 inch squares depending on width of the fusible backing. (I used Lite Steam-A-Seam).
Narrow Borders: front 3/8 yd and back ¼ yd (Moda Bella Solids Tomato Soup)
• Cut (6) 1 ½ inch strips x WOF for front. Trim selvages.
• Cut (4) 1 ½ inch strips x WOF for back borders. Trim selvages
Wide border: ¾ yd (Moda Bella Solids Buttercup)
• Cut (6) 3 inch strips x WOF. Trim selvages
Binding: 5/8 yd (Moda Bella Solids Tomato Soup)
• Cut (7) 2 ½ inch strips x WOF. Trim selvages.
Pieced Backing Strips:
• Cut (32) 2 ½ inch x 10 inch strips. ( I sub cut 8 layer cake pieces into 4 strips each)
Backing: 3 ½ yd (Moda Butterscotch and Roses Ruby Acorn Mosaic)
Batting:
• Cut one piece at least 64 inches x 72 inches. (I like Warm and Natural)
Let’s get sewing........
1. Color selection--I decided that though I loved all the fabrics in the Salt Air line, that I would use only the small to medium scale prints that had red and/or yellow in them. Some of the larger scale prints might have gotten lost in the circles and I wanted the front to be a little simpler with limited red/yellow/blue color scheme.

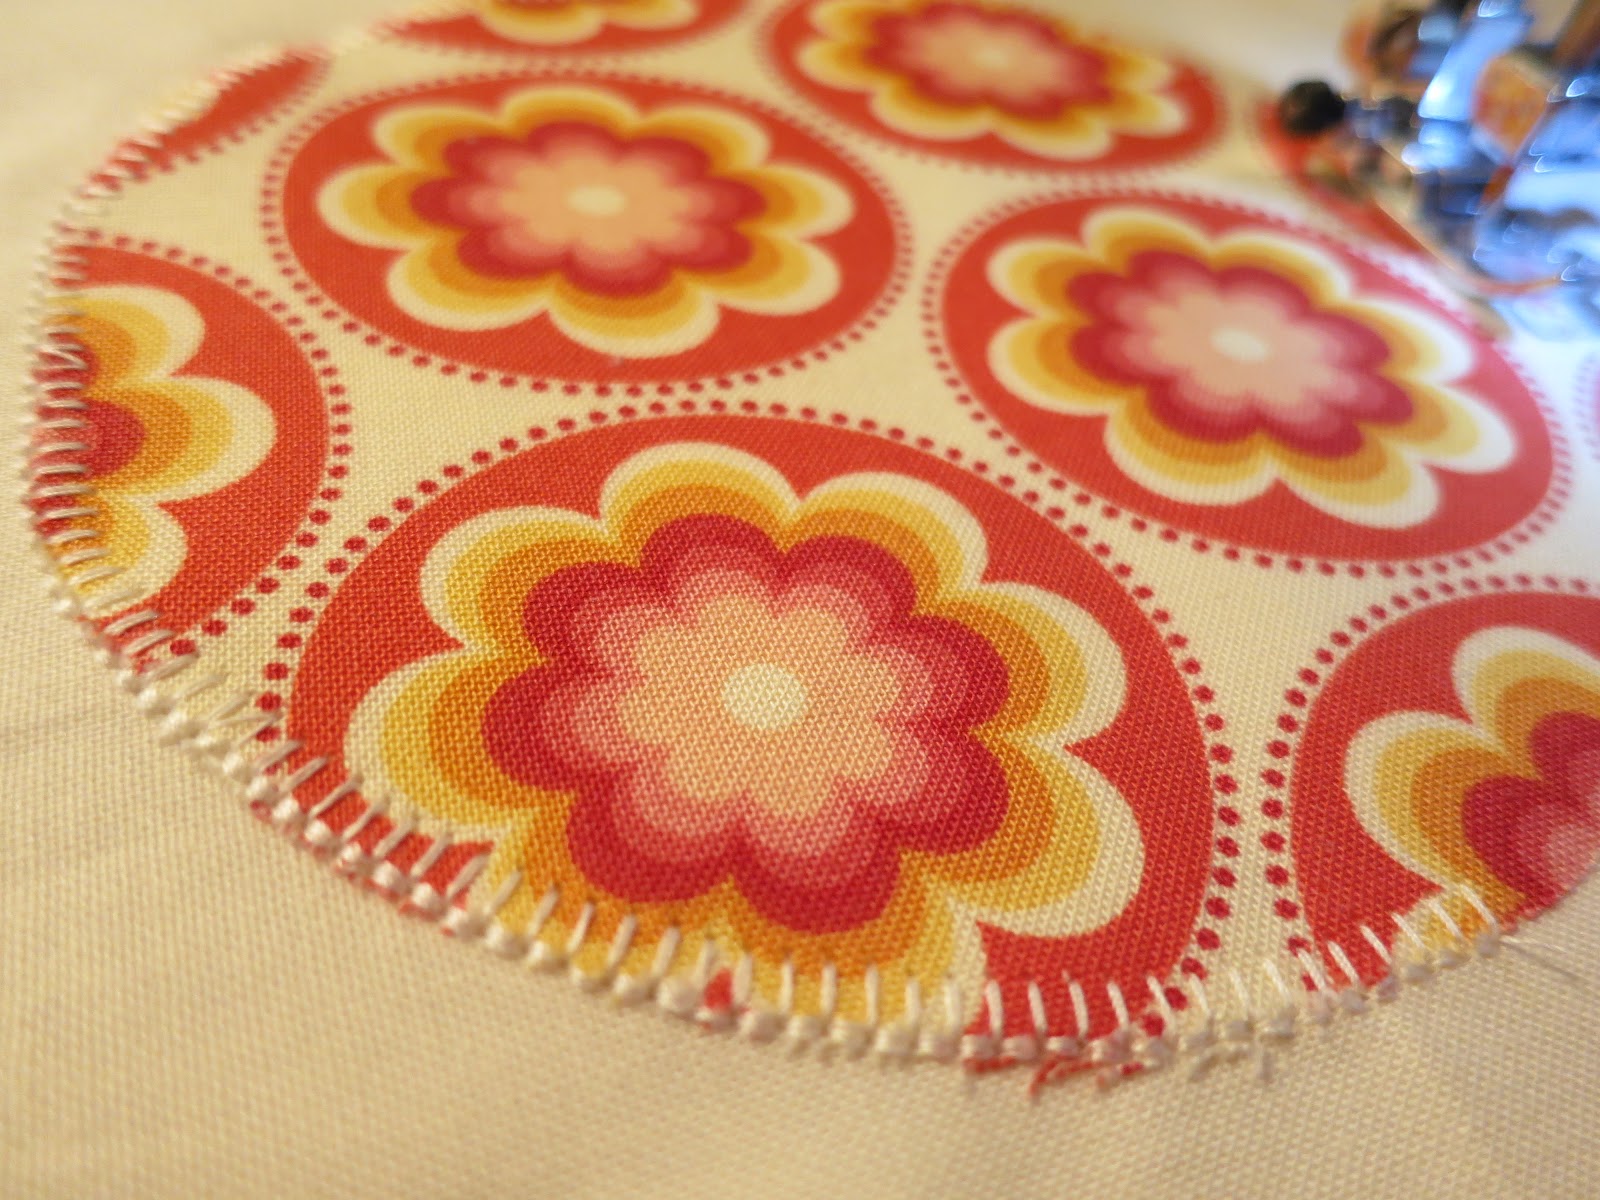
2. I used my paper cutter to speed up the cutting of the fusible web into 5 inch squares. Apply fusible web per instruction to the back of all fabric squares. I then used my AccuQuilt to cut my circles but you could use any circle shape to draw around and use as a template. Because the AccuQuilt Go Baby die for the 5 inch circles was a tight fit, I used painters’ tape to hold the 4 squares that I ran through it each time, placing fabric exactly and very carefully over the die circle. Worked like a dream! Being able to cut multiple circles at a time is an advantage of the Go Baby!


3. After my 56 circles were cut, I arranged them in the rows/columns that I liked and numbered them using my painters tape. (Love that tape—helps keep my rows in order and arrows keep me pointed in the right direction) Arrange 7 across by 8 down.


4. Cut your back ground squares as above in cutting instructions. You need (56) 7 ½ x7 ½ inch squares.


5. To center the circles on the squares—I lightly finger-pressed the squares into fourths and then did the same for the circles. I then used the lines as guides to line up the circle in the middle of the square. Press/iron and adhere the circle to the square according to the fusible web instructions.


6. Time now to appliqué around the circles. Yes, 56 circles may take a little while but it gave me lots of time to think about the circles and people in my life….and yes, by the time you have them all finished, you will be a real pro at appliquéing around a circle-- in case you needed any practice to begin with? It is sort of a no-brainer sewing step and it gave me lots of time to talk and chat at my evening quilt group as my machine went round in circles. I used the basic blanket stitch on my machine but you certainly can use a tight zigzag. Catch the edge in the stitching to ensure it is not going to fray.

Join us tomorrow for Part 2 where we will finish up the quilt top by piecing the rest of the squares together and adding the sashing. The full schedule for the week is as follows:
~ Monday (March 19) ~
Part 1: Quilt Top (Cutting / Appliqueing)
~ Tuesday (March 20) ~
Part 2: Quilt Top Continued (Piecing / Sashing)
~ Wednesday (March 21) ~
Part 3: Quilt Backing
~ Thursday (March 22) ~
Part 4: Quilting
~ Friday (March 23) ~
Part 5: Binding
Thanks SO much, Mom, for sharing this wonderful project with everyone. If you are reading this post in your reader or email, I'd love for you to pop on over and show Grandma Jane some love by leaving her a comment. I can't thank her enough for putting this series together!
Also, if you have any questions throughout this series, just leave a comment and Grandma Jane will be popping in to make sure you get the answers you need.


0 comments:
Post a Comment